
Here is my scenario. About 2 years ago (25000) I rebuilt my 1600DP with stock crank, 87mm pistons (I know, bad choice, thin walls), Scat C35 cam, remote oil filter w/ slim line oil pump cover with inlet & discharge, 1.5qt deep sump, SVDA w/ Petronix ignition module, & a single Weber W222051 31 replacement carb found on a shelf unused. Now here are the problems that I am currently having...
I have never felt I was able to get the carb completely tuned. It seem to have both rich and lean characters. I would have a hard time accelerating from 45-50mph, die while rolling to a stop and pop after I shut it off. I had always thought that that the idle screw was backing out of adjustment. The carb did not have any idle jets (only adjustment screw), air correction circuits to fill in that empty void between idle and main jet circuits. To remedy that problem, I have purchased and plan to install a remanufactured Solex 34 Pict 3.
I also felt that since the PO had removed the thermostat and never drilled the heat riser passage on the header, this was also partially to blame for the poor running characteristics as well as fuel dropping out before it got to the cylinders. I pulled the plugs to read them and was kind of baffled from what I discovered. It looks like 1 and 3 were running lean and hot as 2 & 4 were running rich. I also noticed I could have an excess of blow by as the breather tube is very oily and there seems to be oil leaking past the crank pulley and a small leak at the output seal. I am assuming that the rings never got to seated correctly from day one, even with correcting all the other problems I am still going to have blow-by in 2 & 4. The other possibility that I can think of is that the fuel is droping out so that by the time it reaches 3 & 1 its mostly air and no fuel and all the fuel is running is making it to 2 & 4 never getting up to temp and never fully expanding causing blow by. -Update( with the engine out of the car I was able do a by-hand compression test and only #1 would hold pressure as the rest of the cylenders would quickly bleed off. I got problems...
Here is what I am thinking. I already have the engine pulled to install the thermostat assembly, and now going to replace the output seal and flywheel o-ring. I am thinking I should also pull the heads and inspect to see what the case here is really.
Question 1: If I find that there is in fact something wrong like the hatch is gone off the cylinder walls, should I (A) hone and re-ring the cylinders, (B) hone and re-ring my previous 85.5 flat top pistons and cylinders or (C) grin and bare it and buy a set or 85.5 dished P&C's (last resort but I am leaning toward doing it right with new stuff)?
Question 2: Should I replace the EMPI oil pump cover with one that has a single outlet and full flow the case for the inlet?
Rebuild #2- Fixing my previous mistakes & Avoid New Ones
-
Snap

- Getting Hooked!
- Location: Newberg, Oregon
- Status: Offline
Rebuild #2- Fixing my previous mistakes & Avoid New Ones
-Snap
'70 Type II
9 Passenger
1641 DP
Solex- 34 PICT 3
'70 Type II
9 Passenger
1641 DP
Solex- 34 PICT 3
-
Snap
- Getting Hooked!
- Location: Newberg, Oregon
- Status: Offline
Re: Rebuild #2- Fixing my previous mistakes & Avoid New Ones
I pulled the engine a part and this what is looks like so far..
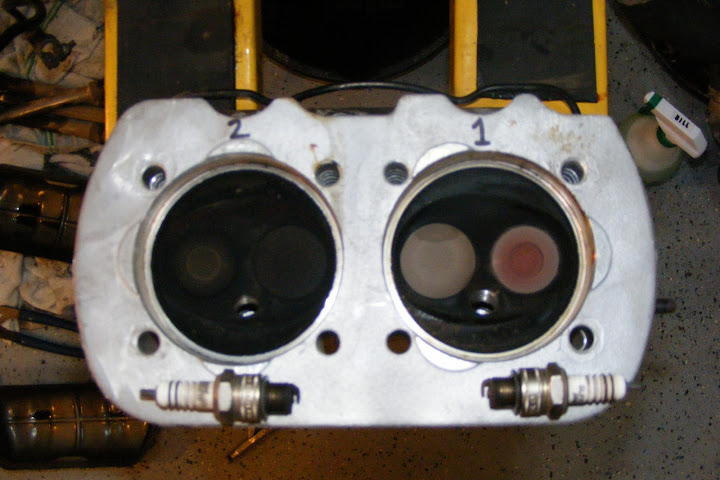
The exhaust valve is protruding .1256" above the seat surface on #2
The exhaust valve on #1 is flush. These were new heads and not rebuilds. Why is the seat so much lower on this one?

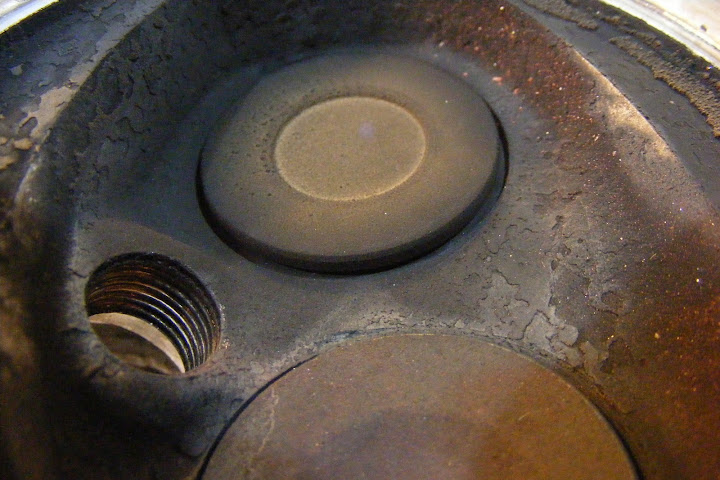
Here is #3 and # 4
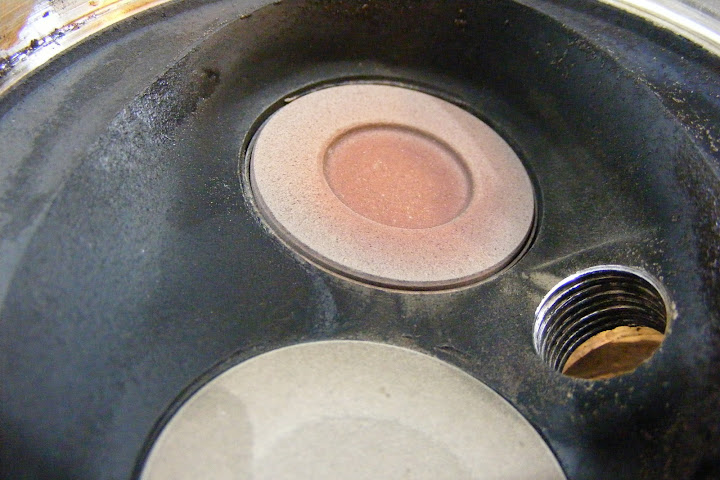
Close up on #4, again almost flush.
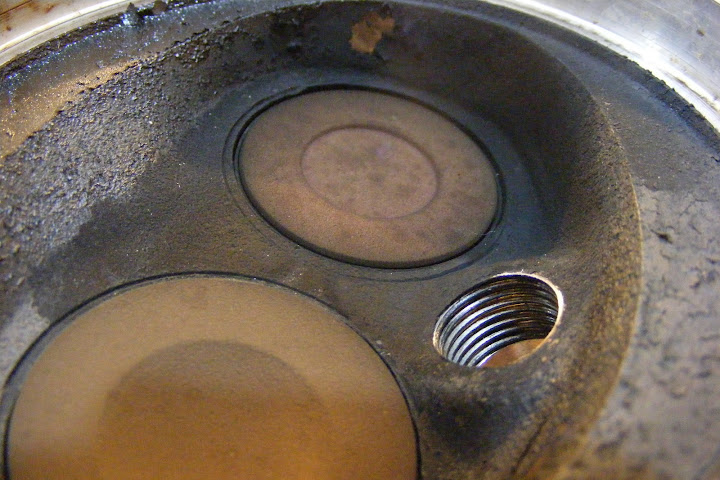
Close up on #3 Exhaust. Lower than #4.
Did they heat up too much and soften the aluminum and pound the seats into the head? Do they need to be worked over as well?

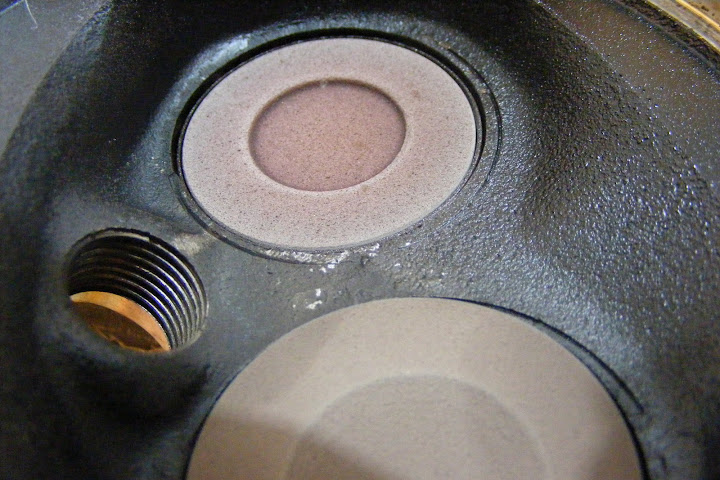
The cross hatching still seems to be present
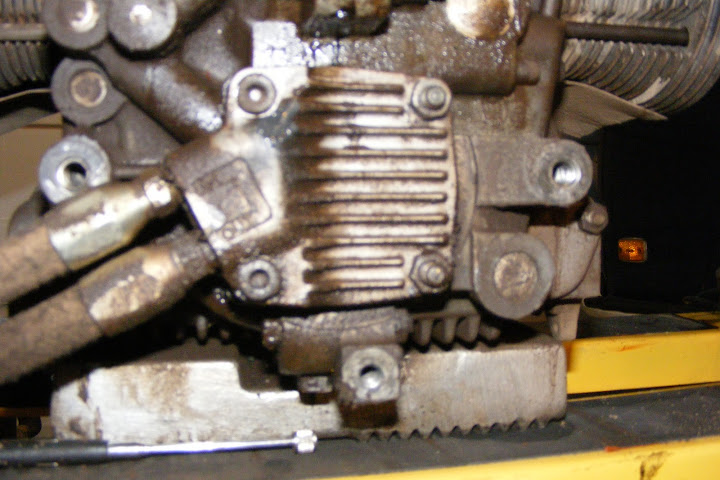
Here is the oil pump full flow cover in question
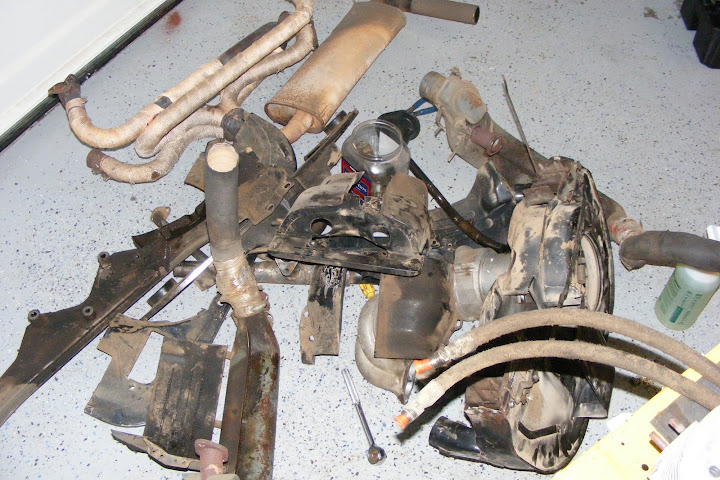
Pile of tin, I am taking the header wrap off the header. I was trying to scavenge more exhaust but I think I may have casued some problems to heads due to this.
The exhaust valve is protruding .1256" above the seat surface on #2
The exhaust valve on #1 is flush. These were new heads and not rebuilds. Why is the seat so much lower on this one?
Here is #3 and # 4
Close up on #4, again almost flush.
Close up on #3 Exhaust. Lower than #4.
Did they heat up too much and soften the aluminum and pound the seats into the head? Do they need to be worked over as well?
The cross hatching still seems to be present
Here is the oil pump full flow cover in question
Pile of tin, I am taking the header wrap off the header. I was trying to scavenge more exhaust but I think I may have casued some problems to heads due to this.
-Snap
'70 Type II
9 Passenger
1641 DP
Solex- 34 PICT 3
'70 Type II
9 Passenger
1641 DP
Solex- 34 PICT 3
-
ruckman101

- Lord God King Bwana
- Location: Up next to a volcano.
- Contact:
- Status: Offline
Re: Rebuild #2- Fixing my previous mistakes & Avoid New Ones
Seems like all the exhaust valves should be riding high as #2 is. My rebuild was many moons ago, addressing a crankshaft that had broken into two pieces. But that was about it, new rings, variable speeds to seat the first 500 miles. I've never had valve-work done, just stock heads gone over to file out flashing between the cooling fins. I've got a stock engine I've started, and I did pull the valves on those heads and lapped them in a bit with valve grind compound after noticing water leaking past an exhaust valve when measuring the volume. You might pull the valves and give the seats a look.
It is critical to get the hole in the exhaust that feeds the heat-riser tube. I think I would ditch all that sump oil set-up, from what I understand, it's just that much more oil and that much longer it takes to get the engine up to operating temperature. The cross-hatching looks aggressive to me.
Not sure if that's any help, I'll keep pondering. I'm far from an expert.
neal
The slipper has no teeth.
-
ruckman101
- Lord God King Bwana
- Location: Up next to a volcano.
- Contact:
- Status: Offline
Re: Rebuild #2- Fixing my previous mistakes & Avoid New Ones
I guess I would lap the valves to ensure they are seating, and an opportunity to inspect the seats, and apparently, via Sluggo's issues, with new rings, which I would also do, and haven't in the past, a piston honing is called for. I didn't on my pistons with about as many miles on them as yours when I put in the new rings, just cleaned them good. I need to do a compression test myself to see where my engine is. Close to 80k total on it now.
Bertha's engine is stock but for a similar exhaust and 87 mm P/C.
neal
Bertha's engine is stock but for a similar exhaust and 87 mm P/C.
neal
The slipper has no teeth.
-
Snap
- Getting Hooked!
- Location: Newberg, Oregon
- Status: Offline
Re: Rebuild #2- Fixing my previous mistakes & Avoid New Ones
Thanks so much for the feedback. I think you are right on with lapping the valves to make sure they are all sealing. I think that will also tell me if that one exhaust valve sitting high is an anomaly or is what the other 3 valves should look like. I think you are also spot on about new rings, honing, and checking ring gaps.ruckman101 wrote:I guess I would lap the valves to ensure they are seating, and an opportunity to inspect the seats, and apparently, via Sluggo's issues, with new rings, which I would also do, and haven't in the past, a piston honing is called for. I didn't on my pistons with about as many miles on them as yours when I put in the new rings, just cleaned them good. I need to do a compression test myself to see where my engine is. Close to 80k total on it now.
Bertha's engine is stock but for a similar exhaust and 87 mm P/C.
neal
The heat riser port is drilled out, installed the thermostat flaps, and ditching the Weber. I’ll throw my compression tester in my car and let you borrow it when I see you at the Lab.
-Snap
'70 Type II
9 Passenger
1641 DP
Solex- 34 PICT 3
'70 Type II
9 Passenger
1641 DP
Solex- 34 PICT 3
-
ruckman101
- Lord God King Bwana
- Location: Up next to a volcano.
- Contact:
- Status: Offline
Re: Rebuild #2- Fixing my previous mistakes & Avoid New Ones
I was fortunate to be able to borrow a valve spring compressor from Cheryle's dad.
neal
neal
The slipper has no teeth.
-
ruckman101
- Lord God King Bwana
- Location: Up next to a volcano.
- Contact:
- Status: Offline
Re: Rebuild #2- Fixing my previous mistakes & Avoid New Ones
Be sure to get the ring gaps oriented correctly. I think it's oil scraper at the top, the two rings 90 degrees, one on each side, so 90 degrees from the scraper, but 180 degrees from each other. If I remember correctly.
neal
neal
The slipper has no teeth.
-
Snap
- Getting Hooked!
- Location: Newberg, Oregon
- Status: Offline
Re: Rebuild #2- Fixing my previous mistakes & Avoid New Ones
I will refer to my Bentley to double check that. I am not sure if I correctly orientated them the first time or not. I know I did not gap the rings when I put It together. I was assuming that the manufacter put them together correctly but I am starting to learn to trust no one sells off the shelf quality craftmanship parts.ruckman101 wrote:Be sure to get the ring gaps oriented correctly. I think it's oil scraper at the top, the two rings 90 degrees, one on each side, so 90 degrees from the scraper, but 180 degrees from each other. If I remember correctly.
neal
-Snap
'70 Type II
9 Passenger
1641 DP
Solex- 34 PICT 3
'70 Type II
9 Passenger
1641 DP
Solex- 34 PICT 3
-
Amskeptic

- IAC "Help Desk"

- Status: Offline
Re: Rebuild #2- Fixing my previous mistakes & Avoid New Ones
I want to give you a detailed reply but cannot just yet.Snap wrote:I pulled the engine a part and this what is looks like so far..
Quickly, do not worry about these different installed heights until after you have pulled the valves and looked at the actual ring of contact on the seats.
They should all have approximately 2mm seat contact width.
The valve contact area should be equidistant around the valve, spin it in your fingers, and it should not be too close to the vertical edge of the valve face. Likewise, the 2mm seat contact area should be in the middle of the valve seat. If you see a 5mm + big shiny surface on the seat, you have a soft seat. Look closely at the seats up in the port. If you see a curled edge of aluminum, the seat is receding.
Colin
BobD - 78 Bus . . . 112,730 miles
Chloe - 70 bus . . . 217,593 miles
Naranja - 77 Westy . . . 142,970 miles
Pluck - 1973 Squareback . . . . . . 55,600 miles
Alexus - 91 Lexus LS400 . . . 96,675 miles
Chloe - 70 bus . . . 217,593 miles
Naranja - 77 Westy . . . 142,970 miles
Pluck - 1973 Squareback . . . . . . 55,600 miles
Alexus - 91 Lexus LS400 . . . 96,675 miles
-
chitwnvw

- Resident Troublemaker
- Location: Chicago.
- Status: Offline
Re: Rebuild #2- Fixing my previous mistakes & Avoid New Ones
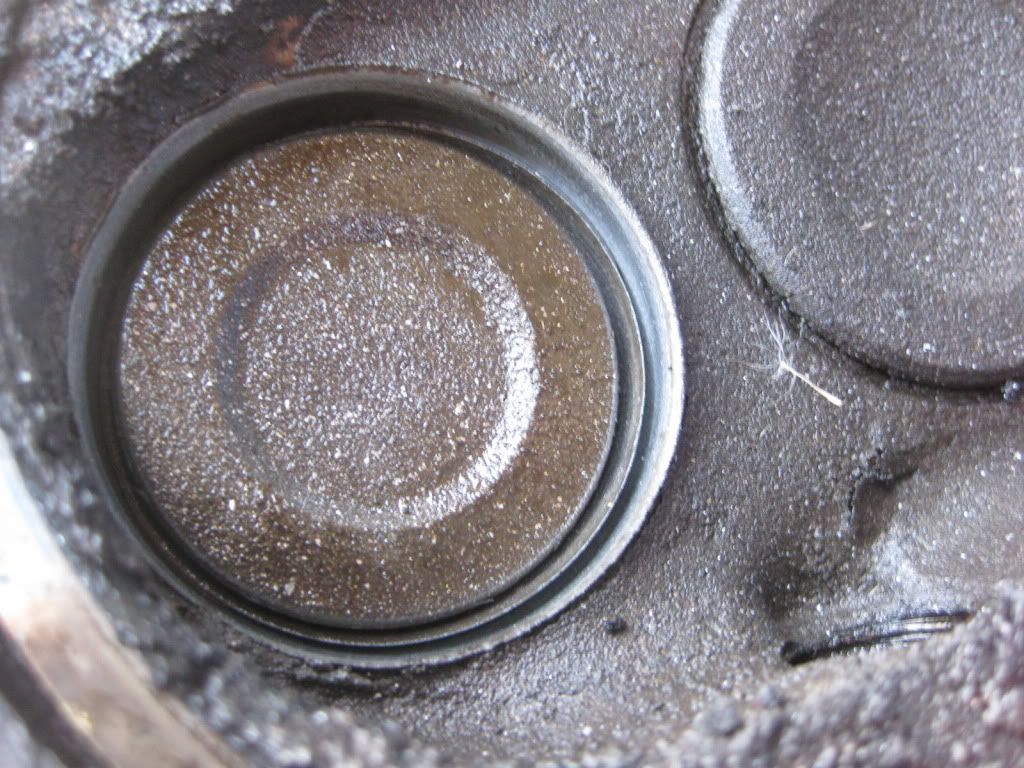
Like this:Amskeptic wrote:If you see a curled edge of aluminum, the seat is receding.
-
Amskeptic
- IAC "Help Desk"
- Status: Offline
Re: Rebuild #2- Fixing my previous mistakes & Avoid New Ones
Well, yours is a pretty clear shot of recession from a still installed valve side. The quote above is for when you can't quite tell and have the valve pulled out. Then you can see the seat where it abuts the port. As it begins to move, the aluminum displaces at the abutment.chitwnvw wrote:Like this:Amskeptic wrote:If you see a curled edge of aluminum, the seat is receding.
Colin
BobD - 78 Bus . . . 112,730 miles
Chloe - 70 bus . . . 217,593 miles
Naranja - 77 Westy . . . 142,970 miles
Pluck - 1973 Squareback . . . . . . 55,600 miles
Alexus - 91 Lexus LS400 . . . 96,675 miles
Chloe - 70 bus . . . 217,593 miles
Naranja - 77 Westy . . . 142,970 miles
Pluck - 1973 Squareback . . . . . . 55,600 miles
Alexus - 91 Lexus LS400 . . . 96,675 miles
-
chitwnvw
- Resident Troublemaker
- Location: Chicago.
- Status: Offline
Re: Rebuild #2- Fixing my previous mistakes & Avoid New Ones
While I have your attention, what are the signs of a weak or bad spring? Would the valve sit proud of the seat like Snap's? Or does it only rear its ugly head while the motor is operating?
-
Amskeptic
- IAC "Help Desk"
- Status: Offline
Re: Rebuild #2- Fixing my previous mistakes & Avoid New Ones
A weak spring still closes the valve with up to 80 pounds of force instead of the preferred 150. That allows bounce at relatively low rpms and is characterized by rattling and loss of power at high rpms.chitwnvw wrote:While I have your attention, what are the signs of a weak or bad spring? Would the valve sit proud of the seat like Snap's? Or does it only rear its ugly head while the motor is operating?
Colin
BobD - 78 Bus . . . 112,730 miles
Chloe - 70 bus . . . 217,593 miles
Naranja - 77 Westy . . . 142,970 miles
Pluck - 1973 Squareback . . . . . . 55,600 miles
Alexus - 91 Lexus LS400 . . . 96,675 miles
Chloe - 70 bus . . . 217,593 miles
Naranja - 77 Westy . . . 142,970 miles
Pluck - 1973 Squareback . . . . . . 55,600 miles
Alexus - 91 Lexus LS400 . . . 96,675 miles
-
Snap
- Getting Hooked!
- Location: Newberg, Oregon
- Status: Offline
Re: Rebuild #2- Fixing my previous mistakes & Avoid New Ones
Ok, I should get a chance to pull the heads apart on Friday night and check the sealing surface with the lapping comppond and some pression blue. Won't the valve height make a differance when CC'ing the head if they are at differant heights? I am thinking about having a three angle valve grind done on the heads but I am really want to know what the real problems are before I start throwing money at it. I am just hoping that I don't have a already go through a complete head rebuild.Amskeptic wrote:Quickly, do not worry about these different installed heights until after you have pulled the valves and looked at the actual ring of contact on the seats.Snap wrote:I pulled the engine a part and this what is looks like so far..
They should all have approximately 2mm seat contact width.
The valve contact area should be equidistant around the valve, spin it in your fingers, and it should not be too close to the vertical edge of the valve face. Likewise, the 2mm seat contact area should be in the middle of the valve seat. If you see a 5mm + big shiny surface on the seat, you have a soft seat. Look closely at the seats up in the port. If you see a curled edge of aluminum, the seat is receding.
Colin
-Snap
'70 Type II
9 Passenger
1641 DP
Solex- 34 PICT 3
'70 Type II
9 Passenger
1641 DP
Solex- 34 PICT 3
-
Amskeptic
- IAC "Help Desk"
- Status: Offline
Re: Rebuild #2- Fixing my previous mistakes & Avoid New Ones
Prussian blue is good for shiny new parts. You will see just fine with your old parts what is carbon gunk versus shiny old contact surfaces.Snap wrote: pression blue.
Won't the valve height make a differance when CC'ing the head if they are at differant heights?
I am thinking about having a three angle valve grind done on the heads.
Yes, combustion chamber volume changes as valve profile in combustion chamber changes. Do not worry about it until after valve work is complete.
A three-angle grind is mandatory if you give half a damn. It allows you to set valve depth/seat contact depth and width.
Make sure you supply all the numbers from your Bentley. If exhaust calls for 2.5mm contact width, DO IT. If intake calls for 2mm contact width, DO IT! Valve margin, face, stem diameter, 22*/23* interference on the intake angles, DO IT, the Germans had their reasons!
Colin
BobD - 78 Bus . . . 112,730 miles
Chloe - 70 bus . . . 217,593 miles
Naranja - 77 Westy . . . 142,970 miles
Pluck - 1973 Squareback . . . . . . 55,600 miles
Alexus - 91 Lexus LS400 . . . 96,675 miles
Chloe - 70 bus . . . 217,593 miles
Naranja - 77 Westy . . . 142,970 miles
Pluck - 1973 Squareback . . . . . . 55,600 miles
Alexus - 91 Lexus LS400 . . . 96,675 miles