Page 2 of 8
Re: Well, Good Grief
Posted: Wed Mar 15, 2017 6:53 am
by 71whitewesty
Amskeptic wrote: ↑Tue Mar 14, 2017 9:08 am
71whitewesty wrote: ↑Tue Mar 14, 2017 7:27 am
been driving a "gulp" 91 dark blue insanely clean Westy.
Errrr, Vanagon or Eurovan?
Colin
Last year of the vanagon...
Re: Well, Good Grief
Posted: Wed Mar 15, 2017 8:18 am
by Amskeptic
71whitewesty wrote: ↑Wed Mar 15, 2017 6:53 am
Amskeptic wrote: ↑Tue Mar 14, 2017 9:08 am
71whitewesty wrote: ↑Tue Mar 14, 2017 7:27 am
been driving a "gulp" 91 dark blue insanely clean Westy.
Errrr, Vanagon or Eurovan?
Colin
Last year of the vanagon...
Good car! No gulp. Enjoy! Enjoy the superior engineering in the absence of any sort of quality craftsmanship.
Colin

Re: Well, Good Grief
Posted: Sun Mar 26, 2017 6:28 pm
by Mr Blotto
Colin - it has been a few weeks since your last rebuild update. Did ya throw in the towel and get a GEX on us??

I want more engine porn damn it, and I want it NOW!

Re: Well, Good Grief
Posted: Mon Mar 27, 2017 10:27 am
by Amskeptic
Mr Blotto wrote: ↑Sun Mar 26, 2017 6:28 pm
Colin - it has been a few weeks since your last rebuild update. Did ya throw in the towel and get a GEX on us??
I want more engine porn damn it, and I want it NOW!
Well, I can give you some amazingly fresh Lexus LS 400 chassis shots with assembly line paint sign-offs and my new hose-clamp-balanced drivershaft, but it did not seem appropriate here.
Engine parts come back from the balancer on Wednesday. Then I assemble the engine.
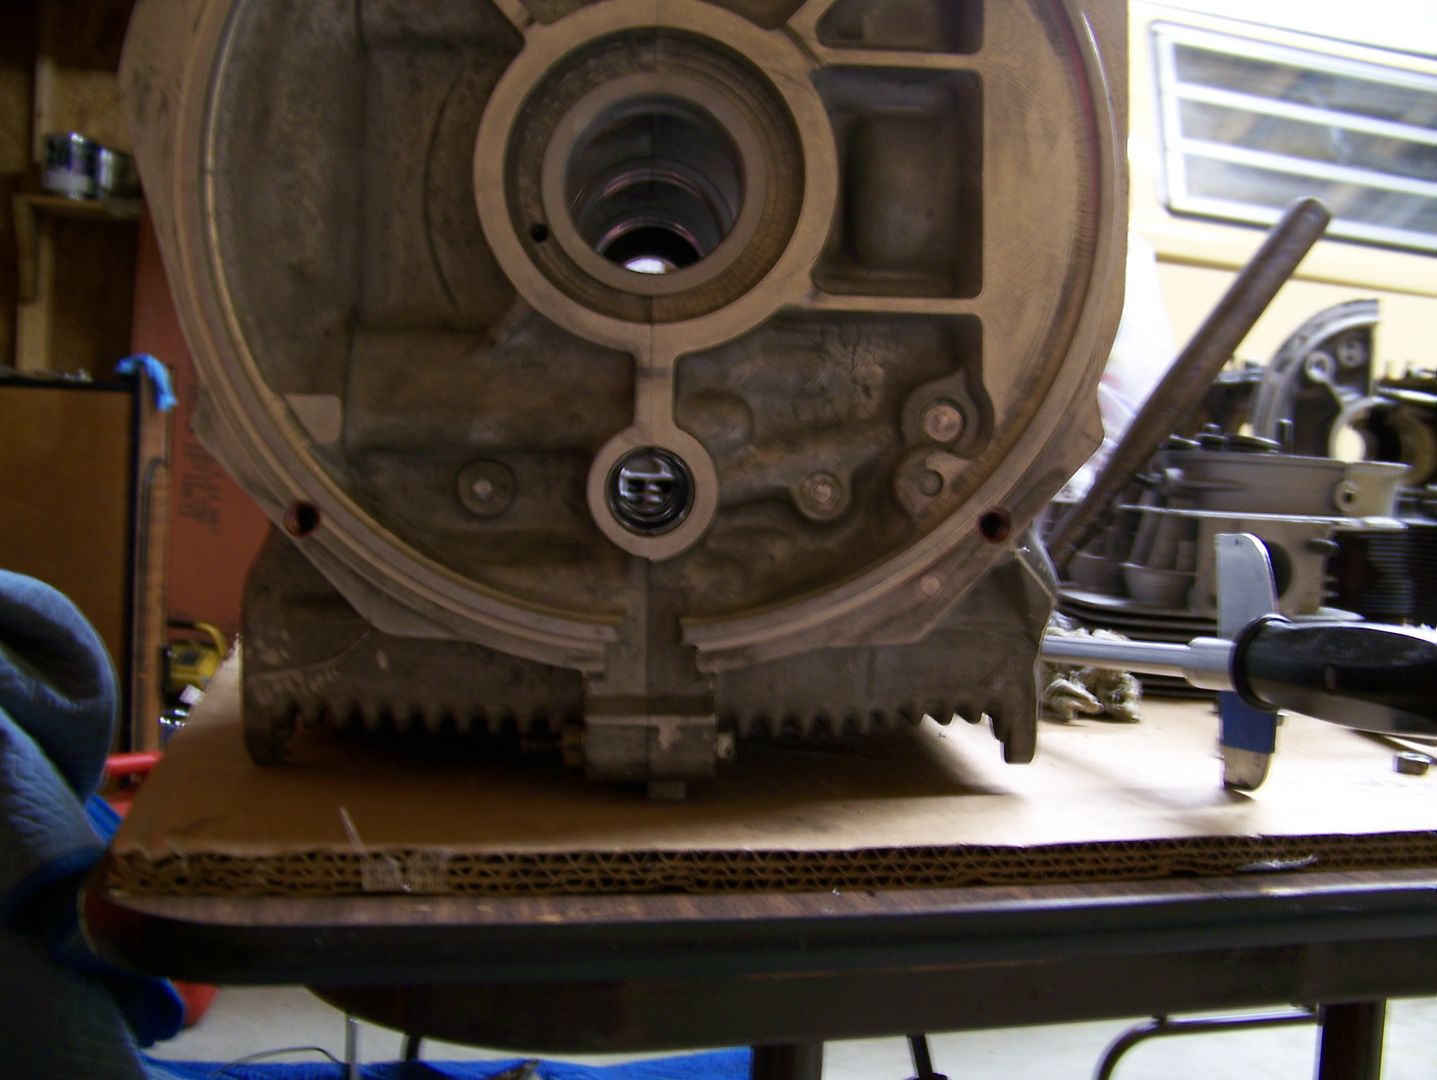
Here, I have the new case and new bearings bolted up so I could measure the expected clearances. With my used-but-in-spec crankshaft, I am starting with some sloppy main bearing clearances, around .003" Phooey, too late:
Torquing the new case to 25 ft/lbs 19mm, and 14 ft/lbs 13mm:
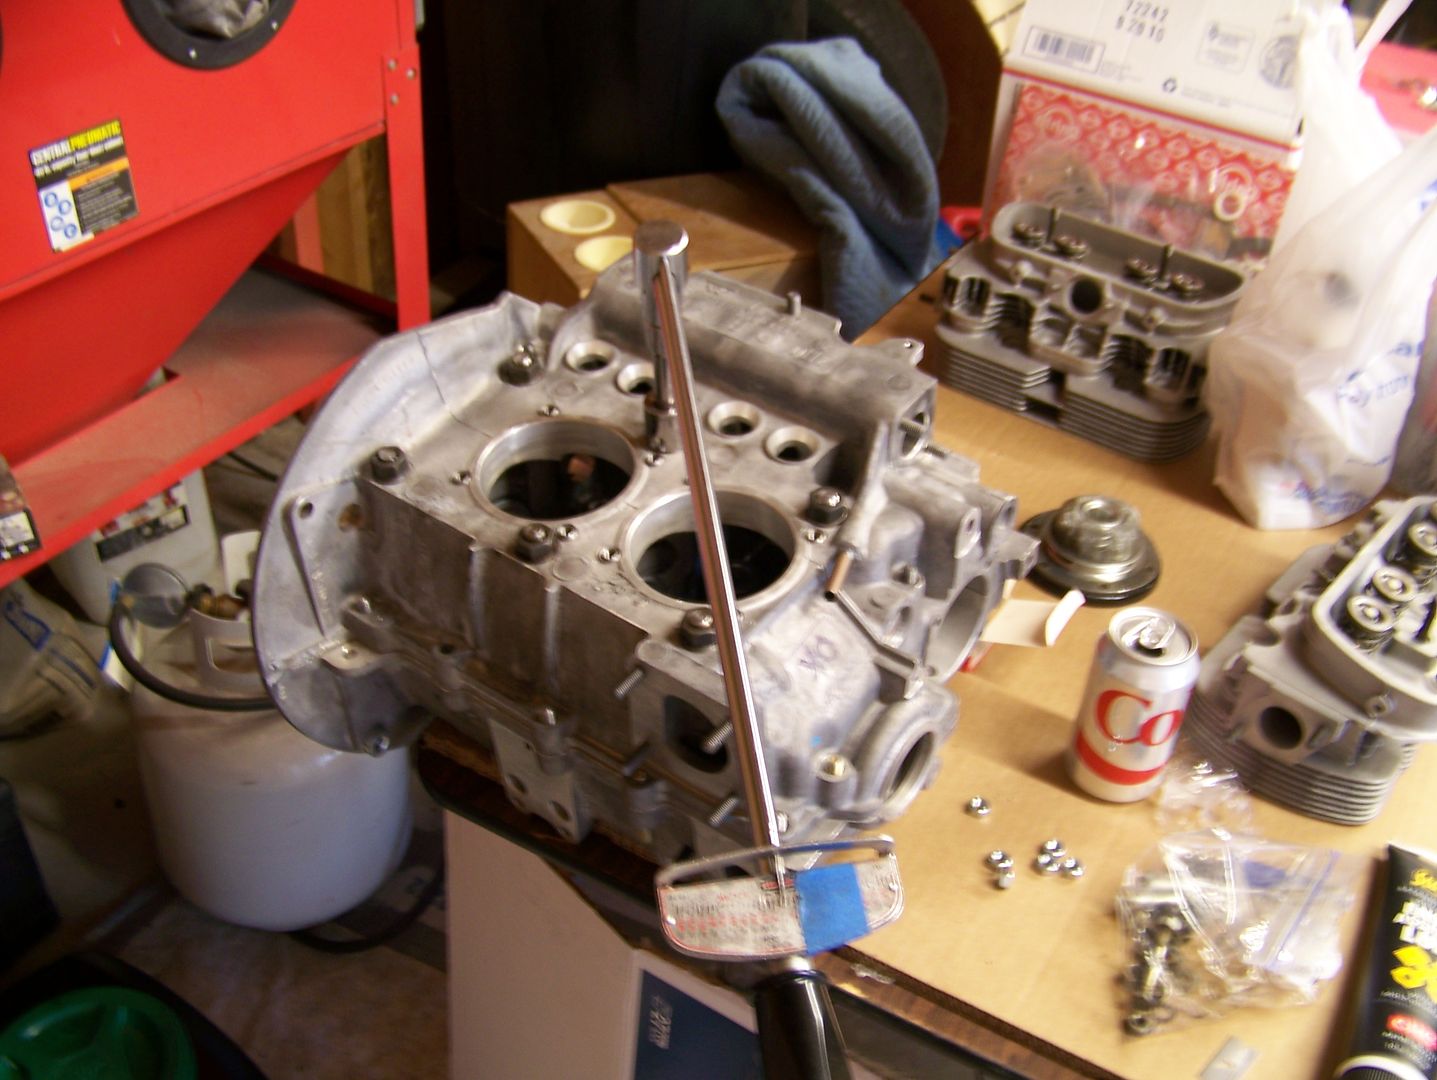
Checking bores for alignment of bearings:
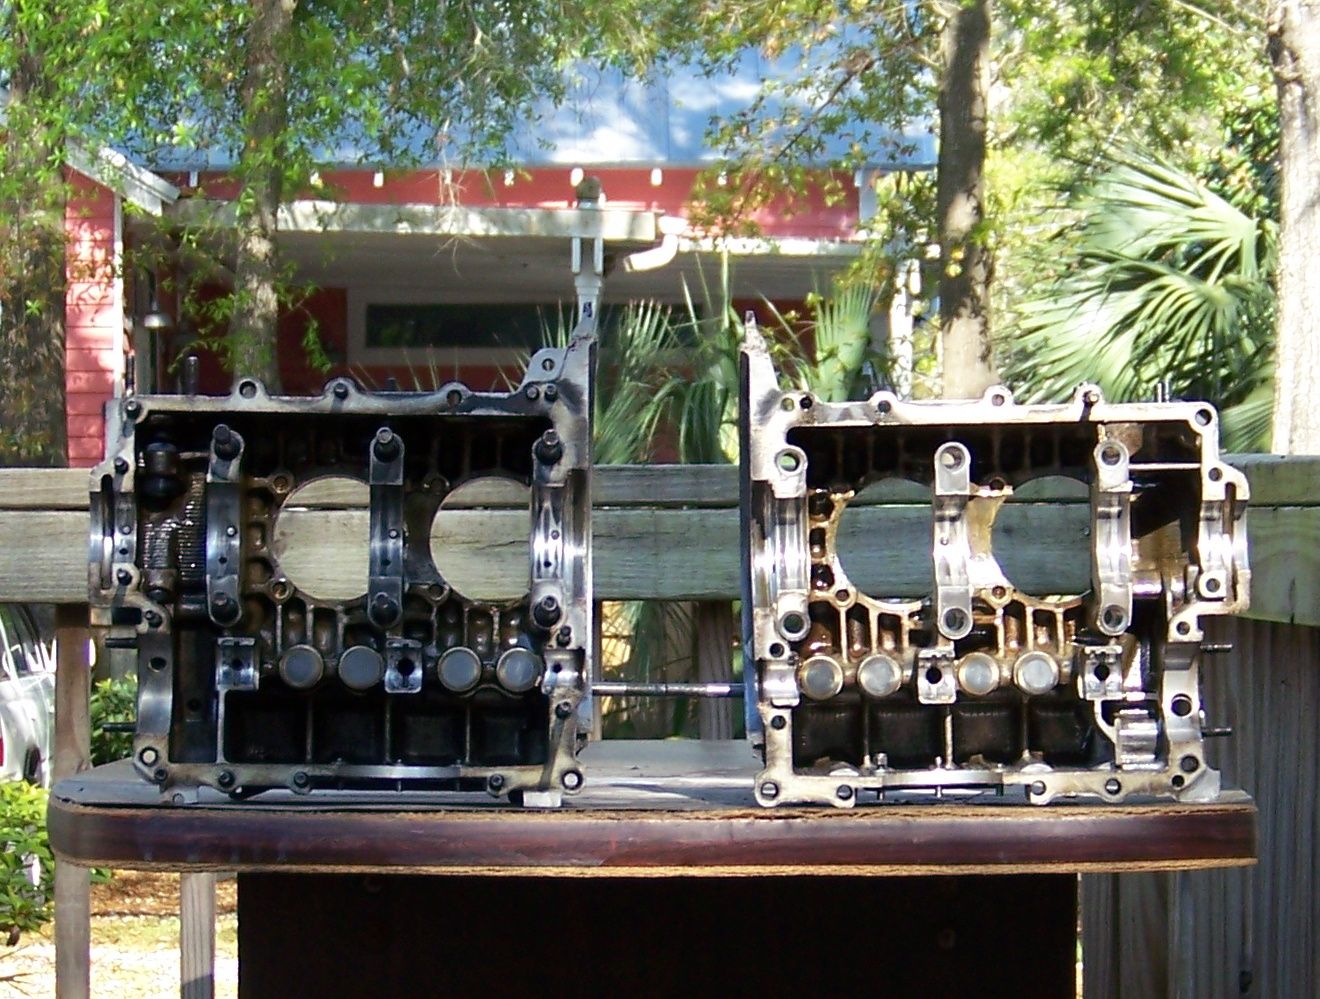
Cleaning the old case because I am going to save it as back-up:
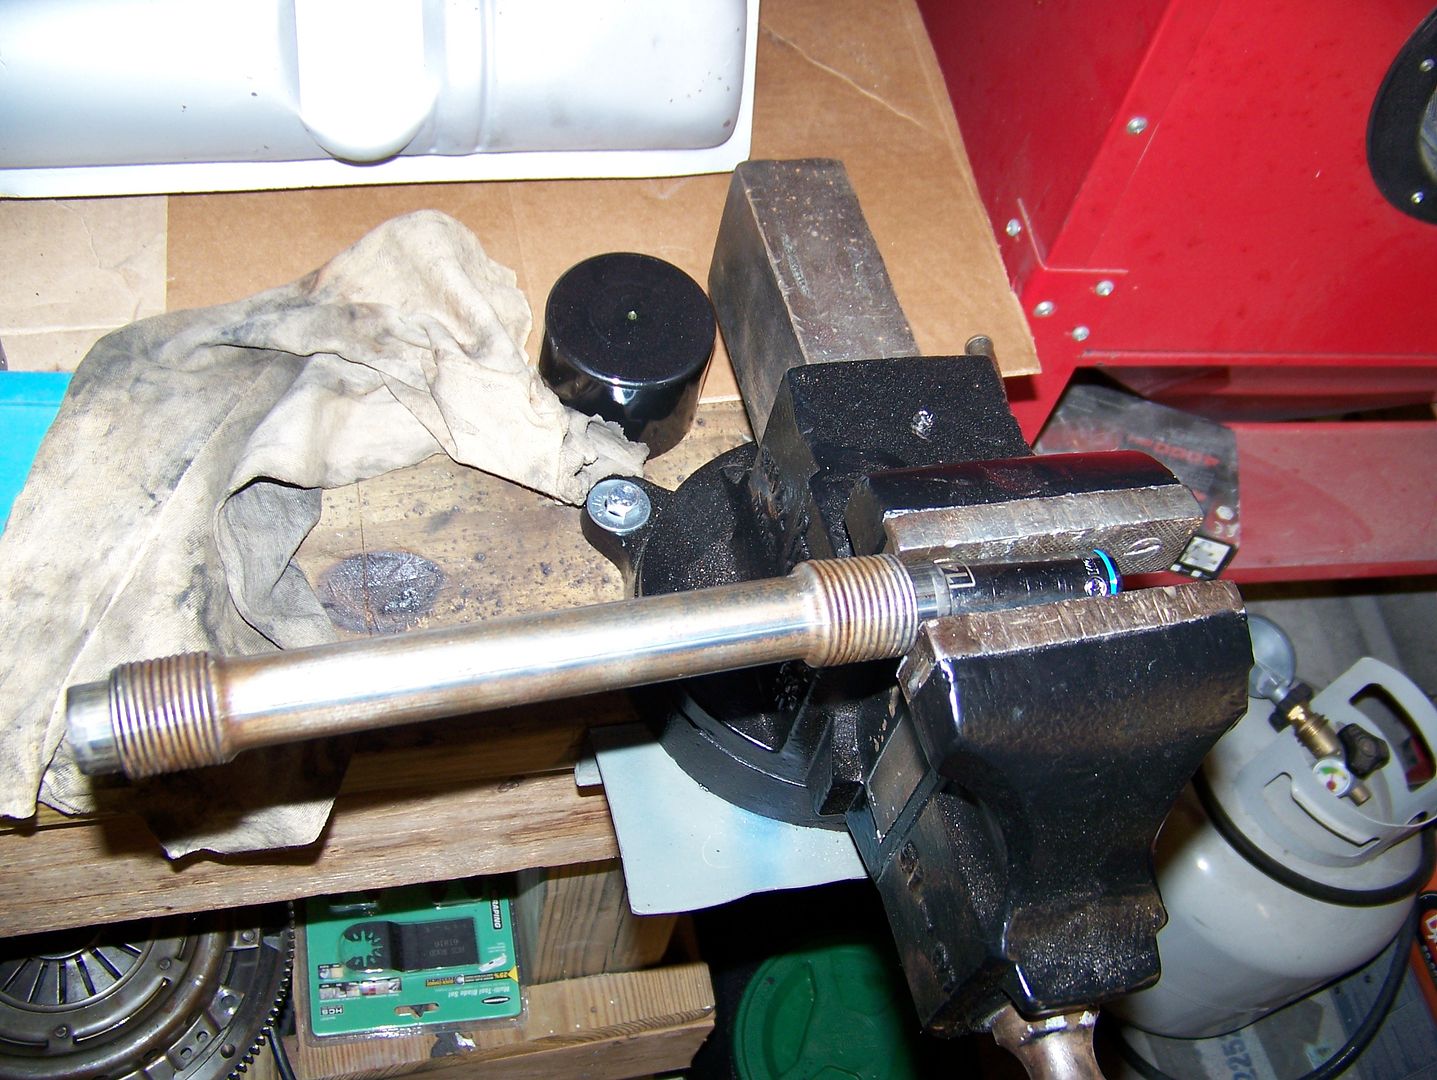
Stretching push rod tubes to my indicator marks:
Using a 14mm socket to guarantee roundness:
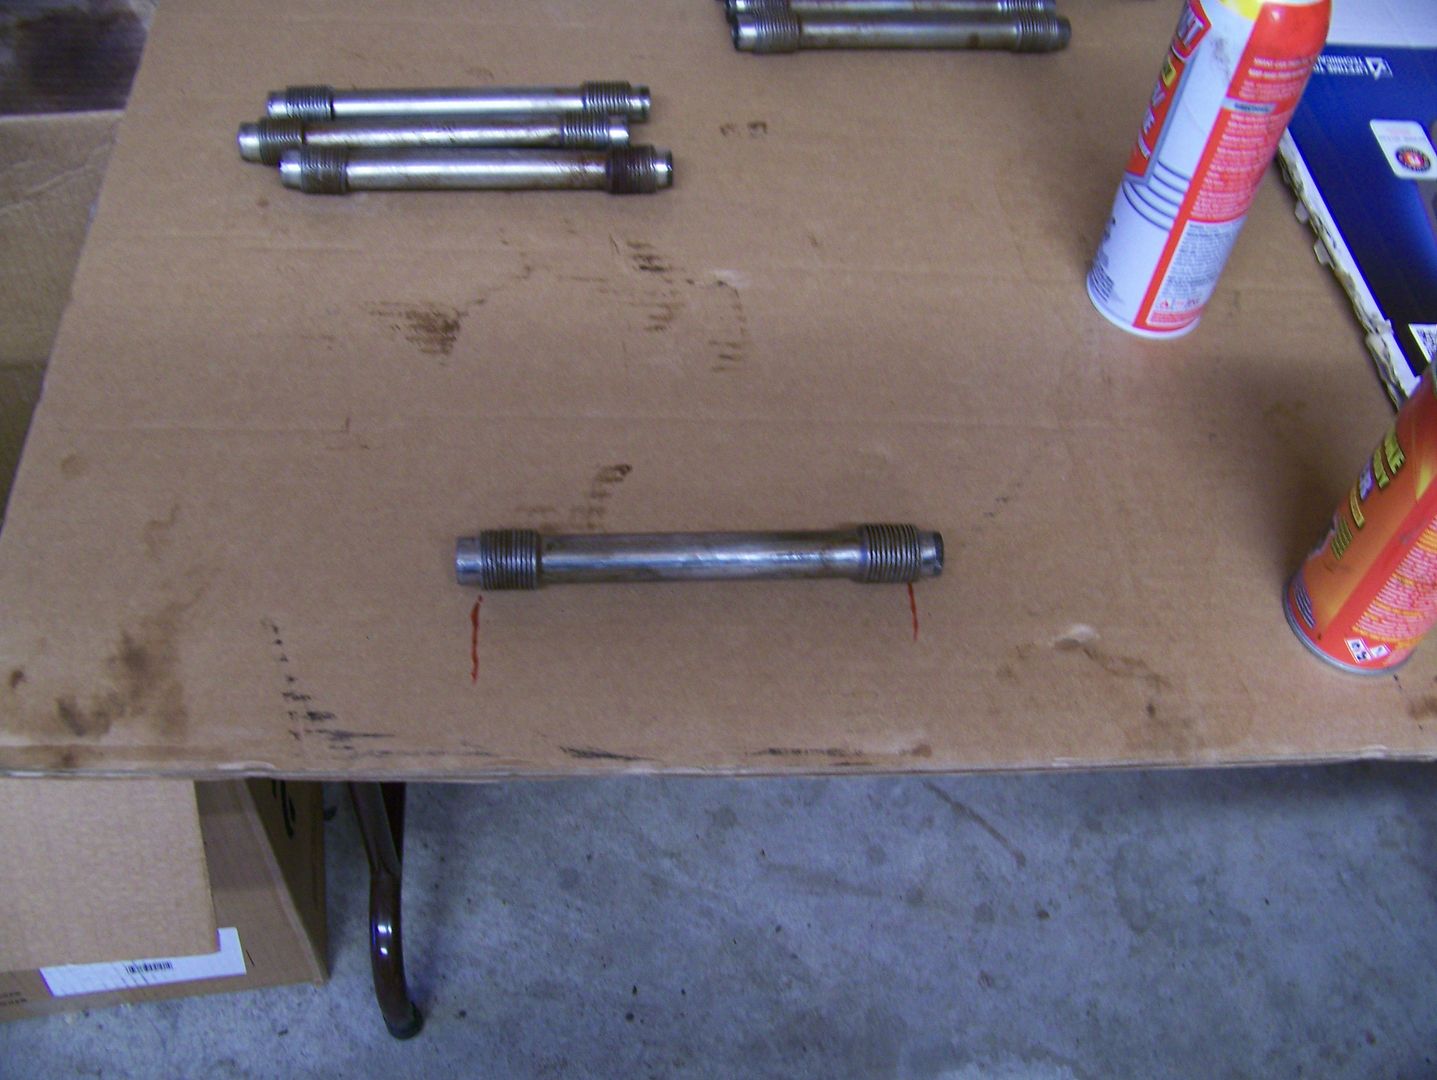
Thread-chased each cylinder head stud. This is critical for accurate head torques!
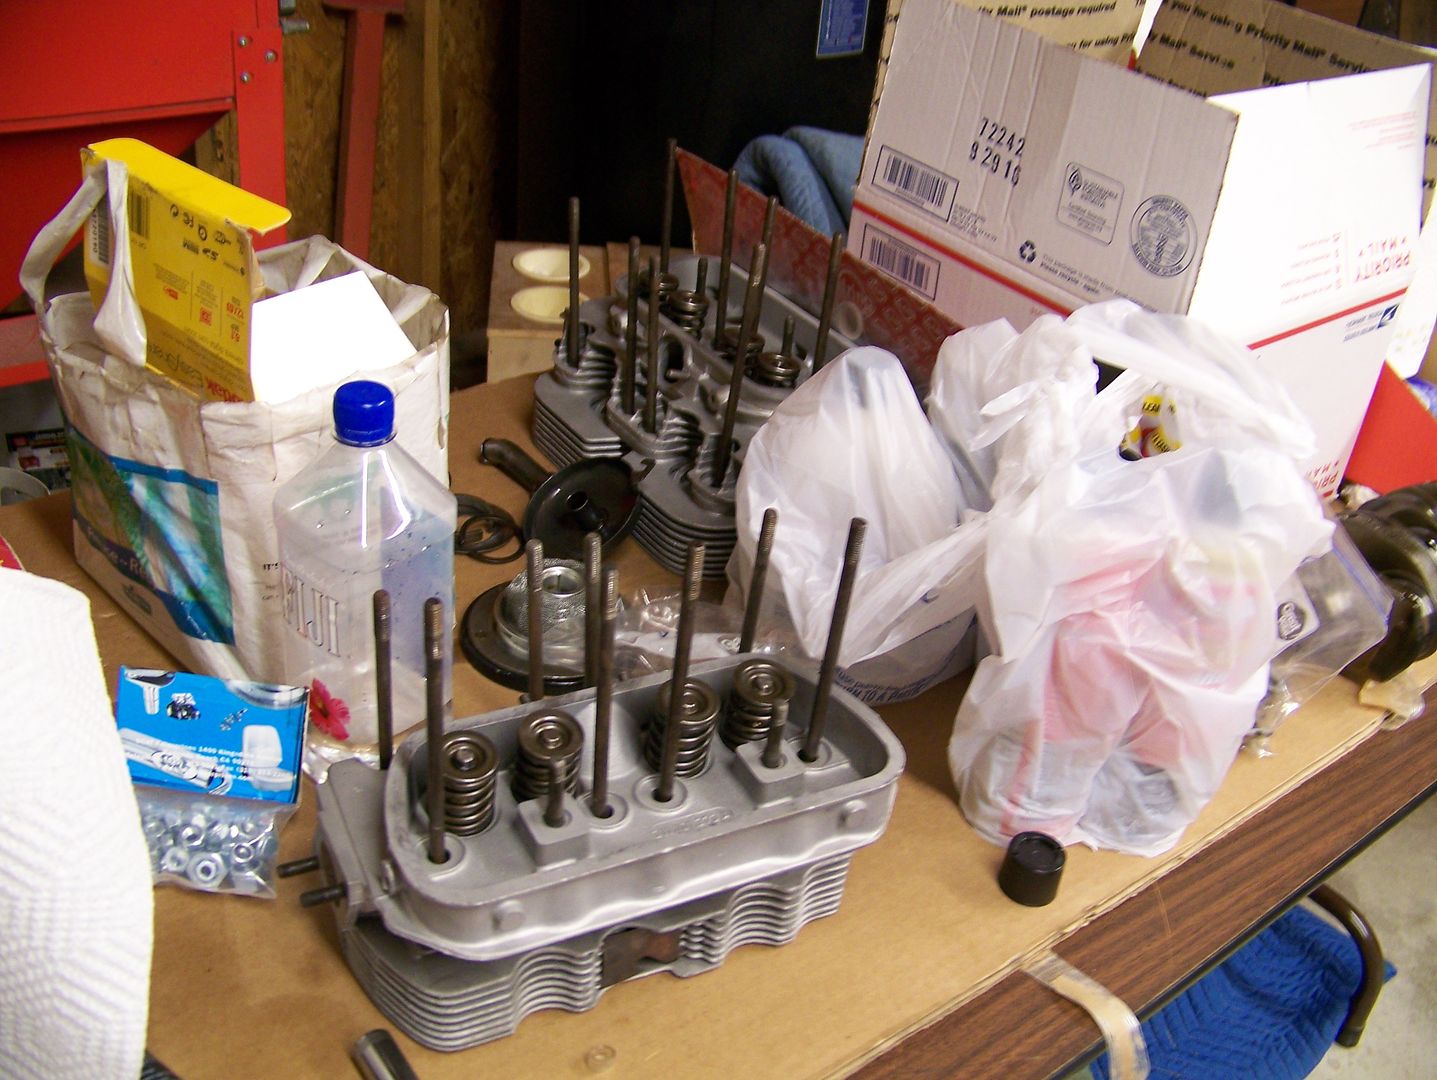
I do not trust these re-valve-seated heads. Much anxiety to ensue. I even see an exhaust valve seat edge sticking into the combustion chamber as though it was not driven deeply enough into the aluminum.
Off to clean parts!
Colin
Re: Well, Good Grief
Posted: Mon Mar 27, 2017 10:46 am
by airkooledchris
Amskeptic wrote: ↑Mon Mar 27, 2017 10:27 am
Well, I can give you some amazingly fresh Lexus LS 400 chassis shots with assembly line paint sign-offs and my new hose-clamp-balanced drivershaft, but it did not seem appropriate here.
I disagree.
As for this engine, what are you going to do about the exhaust valve seat edge sticking into the combustion chamber on that head? (if anything)
Re: Well, Good Grief
Posted: Mon Mar 27, 2017 9:09 pm
by asiab3
Amskeptic wrote: ↑Mon Mar 27, 2017 10:27 am
Thread-chased each cylinder head stud. This is critical for accurate head torques!
It's upsetting how many "professional" engine builders skip steps like this. (100% of the builders I spoke to on my trip said I was wasting time with steps like these……)
--
Lexus pictures are welcome; here is fine with me. :) But another thread is better than no pictures, if you're debating the matter.
No razor blade on the #2 mains saddle to narrow it down?

Robbie
Re: Well, Good Grief
Posted: Tue Mar 28, 2017 9:32 am
by Amskeptic
airkooledchris wrote: ↑Mon Mar 27, 2017 10:46 am
As for this engine, what are you going to do about the exhaust valve seat edge sticking into the combustion chamber on that head? (if anything)
Aaaaauuuuugh, new anxiety attack! It is driving me mad. I do not like it. It is a sharp exposed edge that could become a localized hot spot that over-expands the aluminum in the vicinity and relaxes the press fit. I dunno.
I friggen can't stand sloppy-ass people who do not pay attention! Like me! I should have seen it the day I picked up the repaired heads.
So, I *just got off the phone* with the guys who did the seats in Chloe's head, and what do you suppose the guy said?
a) "Aw naw, they ain't coming out, not our seats, we push 'em in really hard."
b) "Aw naw, they ain't coming out, not our seats, we push 'em in really hard."
c) "Aw naw, they ain't coming out, not our seats, we push 'em in really hard."
d) All of the above
... and the guy said not to worry about the crescent edge of seat sticking out into the combustion chamber. Well of course he said that. I feel reassured not in the slightest.
Colin
Re: Well, Good Grief
Posted: Tue Mar 28, 2017 9:35 am
by Amskeptic
asiab3 wrote: ↑Mon Mar 27, 2017 9:09 pm
No razor blade on the #2 mains saddle to narrow it down?
Robbie
Oh, there will be razor blades. There already have been razor blades. Every machined chamfer edge has been razor bladed at the parting line.
Itinerant Scissorhands
Re: Well, Good Grief
Posted: Tue Mar 28, 2017 10:48 am
by sgkent
around .003" Phooey, too late:
.003" will be fine. You'll have plenty of pressure if the pump cover is dressed too. You'll get a full lifetime from that motor even at .003" although .002" would have been better. I hope you used plasti-gauge to figure that out - it is really the only way.
Re: Well, Good Grief
Posted: Wed Mar 29, 2017 7:39 am
by Amskeptic
sgkent wrote: ↑Tue Mar 28, 2017 10:48 am
around .003" Phooey, too late:
.003" will be fine. You'll have plenty of pressure if the pump cover is dressed too. You'll get a full lifetime from that motor even at .003" although .002" would have been better. I hope you used plasti-gauge to figure that out - it is really the only way.
.
Hey Steve, gotta keep you on your toes:
Tell me more about this "plastigage" on one piece main bearings trapped in a crankcase!
I have to rely on disinterested machinists with busy days and my own Harbor Freight micrometer.
Colin
(p.s. what do you think of valve seats not quite flush with the combustion chamber surface? Did they gall the walls pressing them in, and I have a dam of aluminum crap lifting the seat off the floor of the counterbore?)
Re: Well, Good Grief
Posted: Wed Mar 29, 2017 11:18 am
by sgkent
Split shell bore will be the same as the 1 piece unless the case is pounded in. The crank mains can be successfully measured with a mic. Be sure to hold the mic loosely so the heat from the hand does not warm it. That will cause errors. Also one should use the test gauge once in a while to verify that the gauge is showing correctly. The issue of measuring is on the bore. Getting an accurate bore is very hard because of the way bore dial indicators work. Use the plasti-gauge on the split shell and the rest of the mains should be about the same. Usually .002 to ,0025" is perfect but .003" is going to be within the wear limit. Folks who run high RPM's often run a little on the high side on clearance to prevent seizing at RPM.
The description of the seat is hard to see in my mind because it can be many things. If the seat is a little deep because the machinist set it that way I don't see an issue as long as they got the rest of the geometry right. The issue when one goes too deep often shows up on the stem end. If it sits too high then the valve spring and rocker geometry goes to heck. Also if the stem gets clipped too much then the keepers don't sit right. Also the hardening of the stem end goes away when it is clipped too much. That said, some racers set the valves in deeper to get more air thru. If your valves are in deep because the floor that supports the seat is collapsing then that is not good. The question is why is it so deep? The machinist should have an answer why it is that way. (Or better have,) Also if the valve itself sets in deep then the airflow around it is greater like when racing but unlike racing you are not running this 250 miles then tearing it down for inspection. Also on an exhaust valve one does NOT want the edge of the valve to be really thin - that reduces support, causes the exhaust valve edge to heat up too quickly, and then a too hot edge can be a source for pre-ignition. If you hand lap the valves a little that will show you exactly where the valves and the seats are in contact. we used to shoot for I'd say 1/16" to just over a 1/32" edge on the valves that sat above the contact area. That is a thing done by eye, and the only way to learn it is to have some show some examples of what is good and what is not. A racing head might have more depth on the intake but that is to get more air thru. Back cutting at least the intake valves will help in getting more air into the cylinders too without causing the valves to sit deeper. Len Hoffman is THE man to go to for head work on these air cooled buses. If he is involved then one can relax. If he is not involved then one better know something about the shop that does the work. That is my opinion only. My heads went to RIMCO 3 times in 2009 before I was satisfied and I still had to hand lap them to get them to seal up right. Len's heads are as good as anything Matt and Jeff could do in our old shop back in the 1980's. My work is better than most as the master taught me well, but Matt and Jeff were spectacular. I wish I knew where they were today.
The seats are installed while the head is hot, and then it shrinks. If they scraped aluminum as they were installed that would keep them from properly seating I would think. A little chamfer helps stop that too. There should not really be a gap under the bottom of the seat, I would think that would slow heat from going into the heads. Maybe someone did that thinking it would keep the aluminum around the seat cooler. Of course the valve gets its cooling from the seat and guide. Slow seat cooling and the valve probably will run hotter seems logical. I was always taught that hotter valves are more detrimental to engine life. I've heard many times that is why the older VW bus engines with the blocking air cooler on #3 would drop valves on #3.
Re: Well, Good Grief
Posted: Wed Mar 29, 2017 7:01 pm
by Amskeptic
sgkent wrote: ↑Wed Mar 29, 2017 11:18 am
The description of the seat is hard to see in my mind because it can be many things.
Imagine that it was not pressed in all the way. Then the outer edge of the seat would be sticking out a little from the surrounding combustion chamber aluminum.
Boy, you should have seen the "race ready" rods from AirCooled.Net. Not impressive at all. Smell of burnt oil under the obviously used (and peened!) nuts, horrendously sticky to turn even halfway off, race ready, riiiiiiiiight.
ColinComplainingIsWhatiDo
Re: Well, Good Grief
Posted: Wed Mar 29, 2017 9:10 pm
by kreemoweet
Well, cantcha pull the exhaust valve and take a look-see? Dental mirror might come in handy. Feeler gauge can be slipped
under seat? Uh oh! I've never seen a proud seat in a VW head, always they be a tad below or flush with surface, and the indent
of a staking tool to tighten further the aluminium against the seat.
Re: Well, Good Grief
Posted: Thu Mar 30, 2017 8:12 am
by sgkent
I think no seat should be proud of the head. That sounds like a slow motion crash to me. Get a hold of Len and have him rework the heads for you.
Re the rods - we saw many a rebuilt rod come into the old shop with used engine oil between the cap and rod. It is a sign that it wasn't even cleaned well - let alone resized. Remember in the car going to get your gas tank we discussed the small scribe marks left by the tool that measures the connecting rod bearing bore? We also discussed how some shops simply clean a rod, sand it and call that resized... I warned you about the center wearing faster than the outsides if the machinist is not careful when resizing ... . Sounds like you met that machinist...
Re: Well, Good Grief
Posted: Thu Mar 30, 2017 11:08 am
by asiab3
Gads. I have a set of those "race ready rods" in storage for my next engine. Did you check their balance?
If the seat is bunk, I doubt Len would be interested in fixing someone else mistake, but he might be willing to work on the Yuma heads with the factory valve seats. The Good Machinists and body guys always tell me it's easier to fix damage than a mistake………
I can't wait to see the milage from this engine; my Colorado Dog Hair engine just ticked off 10k last week, including a 96° run to Phoenix and back.

Robbie