
Hey all,
We need new seatbelts for Phred and Colin suggested I ask who swapped Vanagon seatbelts for their Bay Window Bus seatbelts...
Phred is a 1971 T2; what year Vanagon belts do I need to look for, or are they a standard type for a range of years?
Are there any modifications needed on Phred for using the Vanagon belts?
Any help, especially photos, would be most excellent!
Seatbelt Swaps Between a Vanagon and a Bay?
-
zblair

- The Zster
- Location: ATX
- Status: Offline
Seatbelt Swaps Between a Vanagon and a Bay?
1974 T1 Super Beetle "Fweem"
2017 Honda HRV "Domina"
"Love something? Serve it."
~Roshni Mitra
2017 Honda HRV "Domina"
"Love something? Serve it."
~Roshni Mitra
-
dtrumbo

- IAC Addict!
- Location: Mill Creek, WA
- Status: Offline
I've done it and it works great! I believe any year Vanagon belts will work just fine in Phred. If you're just talking about the front, it's really quite easy. The rears are a little trickier, but yet well worth it. I've put Vanagon retractable front belts in the front of my '78 (don't get hung-up on the model year as the '68-'79 are all the same in this respect) and the only thing I had to do (besides bolt them in) was to fabricate a bushing so the shoulder mount would clear the trim. This makes no sense in words so I'll snap some pics in the morning and post 'em up here for ya. In the meantime, start looking around at junkyards and/or check on Craigslist for someone parting out a Vanagon. Before I get totally flamed, here's my disclaimer. It might not be the best idea to use belts from a Vanagon that has been in an accident. That said, the belts in a Vanagon are newer than any belt in a Bay and will be just that much better that what you already have.
One more thing. DO NOT UNDER ANY CIRCUMSTANCES buy aftermarket belts from Beams of Oklahoma City. These are what 99.9% of the online places sell and they are absolute garbage. The worst thing about them is the sensitivity of the locking mechanism in the retractor. It is so sensitive that you can't even pull the belt out to put it on without it locking up. I've complained to Beams about this and they say they have to be uber-sensitive due to legal reasons. This may be all well and good, but the Vanagon belts have retractors that lock when you need them to (crash) and don't when you don't need them to (putting them on!).
As you can tell, I'm a huge fan of this upgrade. Like I said, I'll post pics in the morning with details on how I did the install.
- Dick
1970 Transporter. 2015cc, dual Weber IDF 40's
1978 Riviera Camper. Bone stock GE 2.0L F.I.
1979 Super Beetle convertible.
... as it turns out, it was the coil!
1970 Transporter. 2015cc, dual Weber IDF 40's
1978 Riviera Camper. Bone stock GE 2.0L F.I.
1979 Super Beetle convertible.
... as it turns out, it was the coil!
-
zblair
- The Zster
- Location: ATX
- Status: Offline
Thank you Dick! =D>
This is exactly the explanation I was looking for. We are only doing the front seats; we aren't doing the rear because there isn't rear seating. Jeffrey uses Phred for gigs to haul equipment so we don't have to go there. I've let J know you're going to post photos for us so I will be on the lookout.
Thanks again.
1974 T1 Super Beetle "Fweem"
2017 Honda HRV "Domina"
"Love something? Serve it."
~Roshni Mitra
2017 Honda HRV "Domina"
"Love something? Serve it."
~Roshni Mitra
-
dtrumbo
- IAC Addict!
- Location: Mill Creek, WA
- Status: Offline
As promised, here we go.
First off, after you've obtained your Vanagon belts, you will almost certainly need some extra hardware (nuts, bolts, brackets, caps, etc.). The hardware is 7/16"-20. No, it's not metric. Seat belt hardware is standardized and apparently the US automakers set the standard. 7/16"-20 grade 8 (hardened) hardware is readily available at your local Ace hardware or other well-stocked hardware store. The brackets, caps and other doo-dads that you may need are available from various online seat belt vendors. I've used www.seatbeltpros.com and had good experiences. Now on with the show...
The lap portion of the belt and the retractor mount to the floor using the same hole that the original lap belt used.
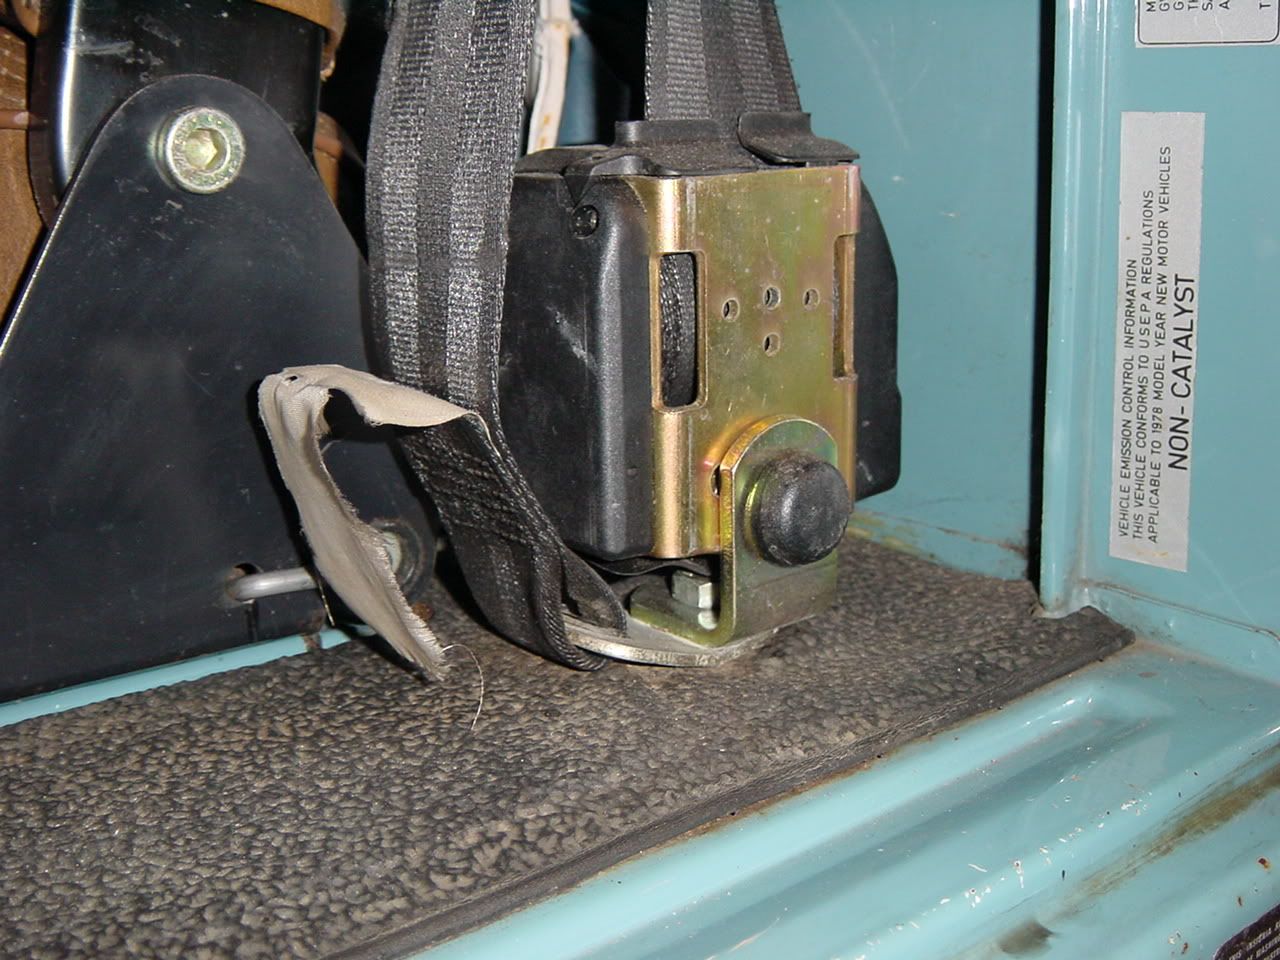
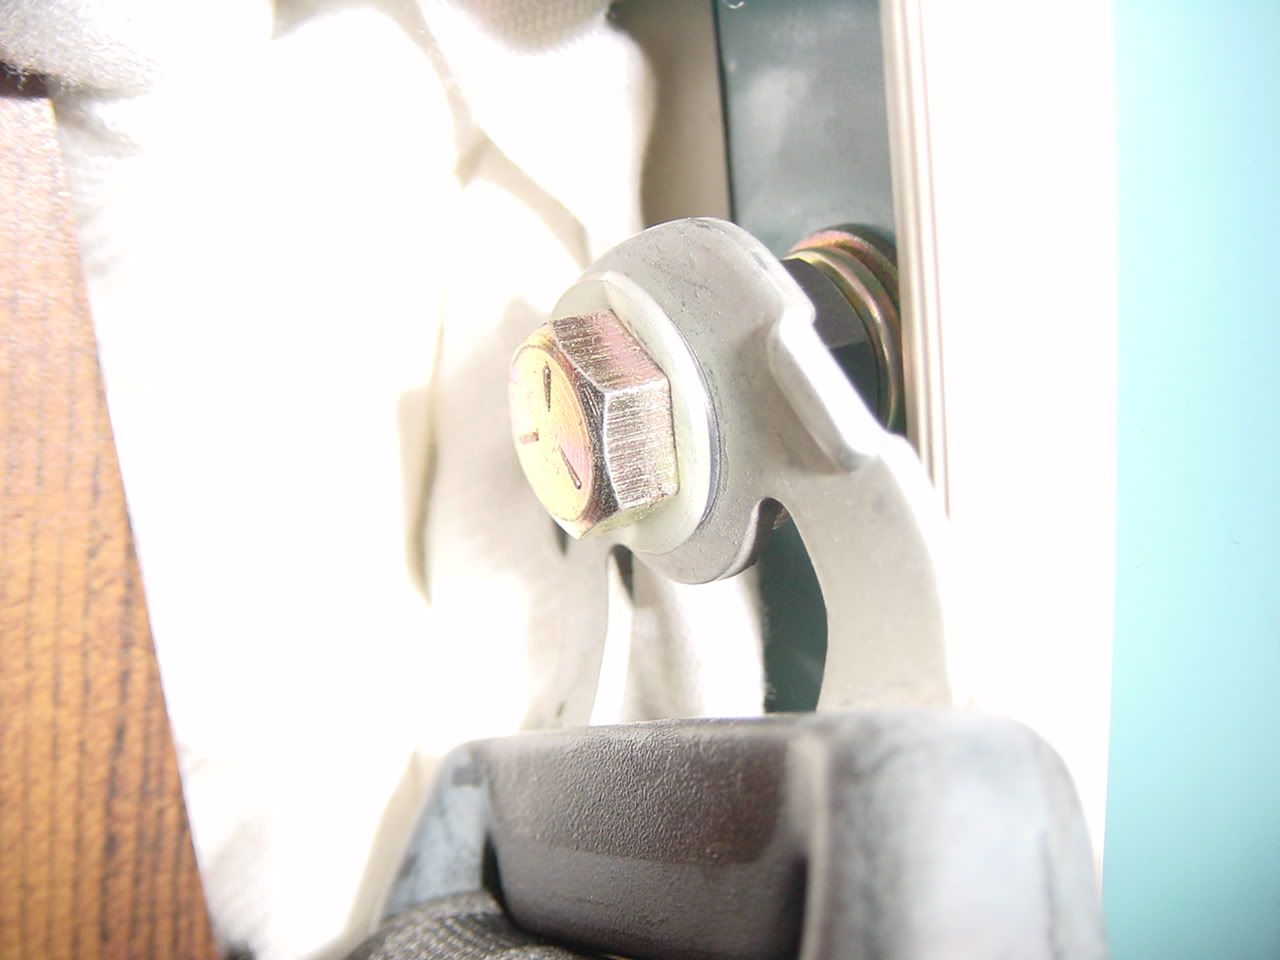
The retractor MUST be vertical for the locking mechanism to work properly. If the retractor is not vertical, the unit will lock preventing you from pulling the belt out which makes it difficult to put the seat belt on. Here is a closer look.
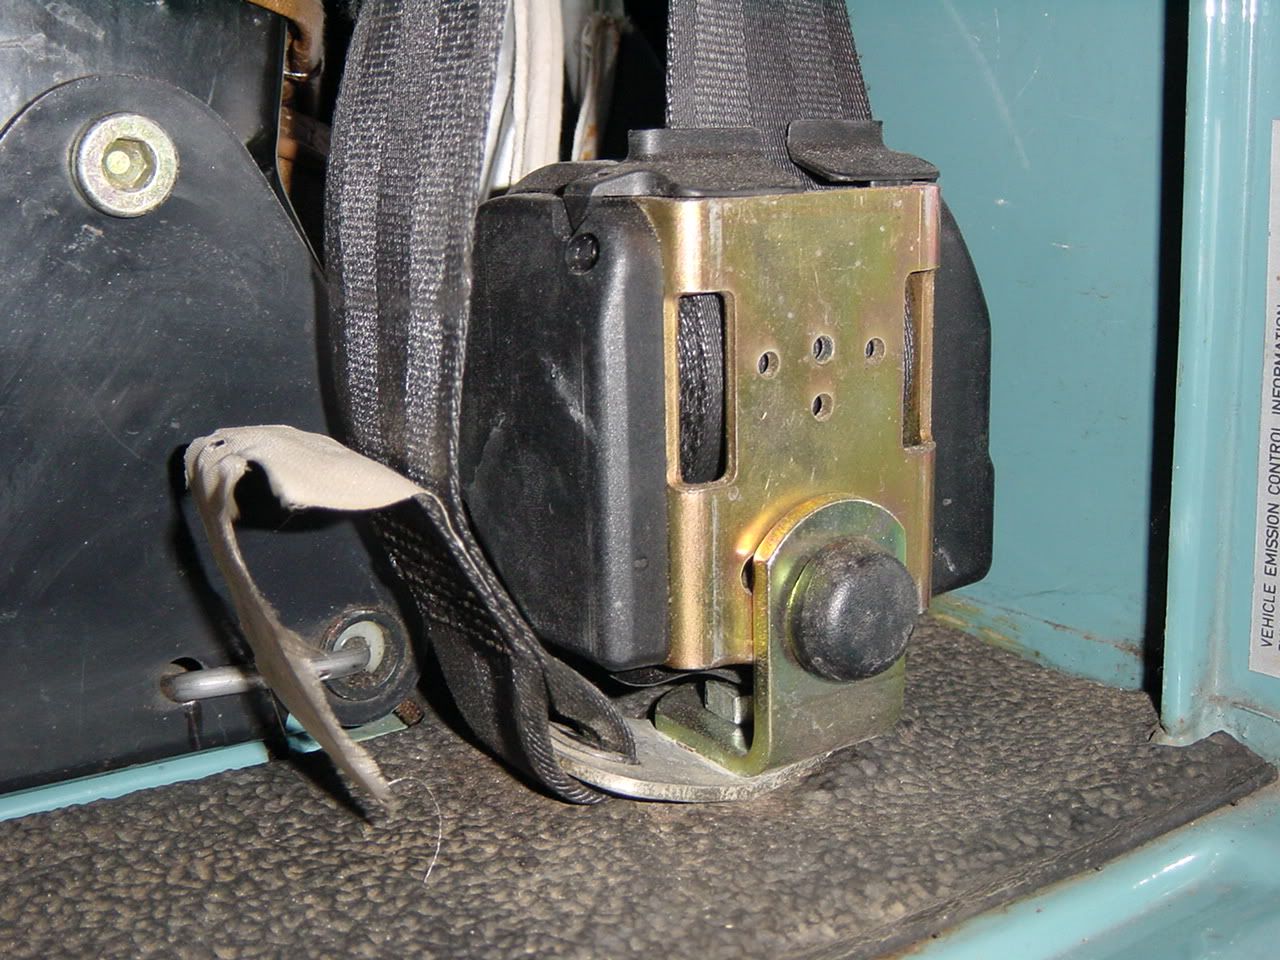
In this photo you can see that I used a right-angle bracket to mount the retractor and a plastic cap to cover the unsightly bolt head. The retractor will have an alignment pin sticking out of one of the small holes just above the black cap. In a Vanagon, this pin aligns the retractor vertically without the assembly-line worker having to put any thought into it. When I installed mine, the pin could be a poking hazard so I removed it by twisting it out with a pair of vice-grips.
The next step is to mount the shoulder bracket which is the part shown here.
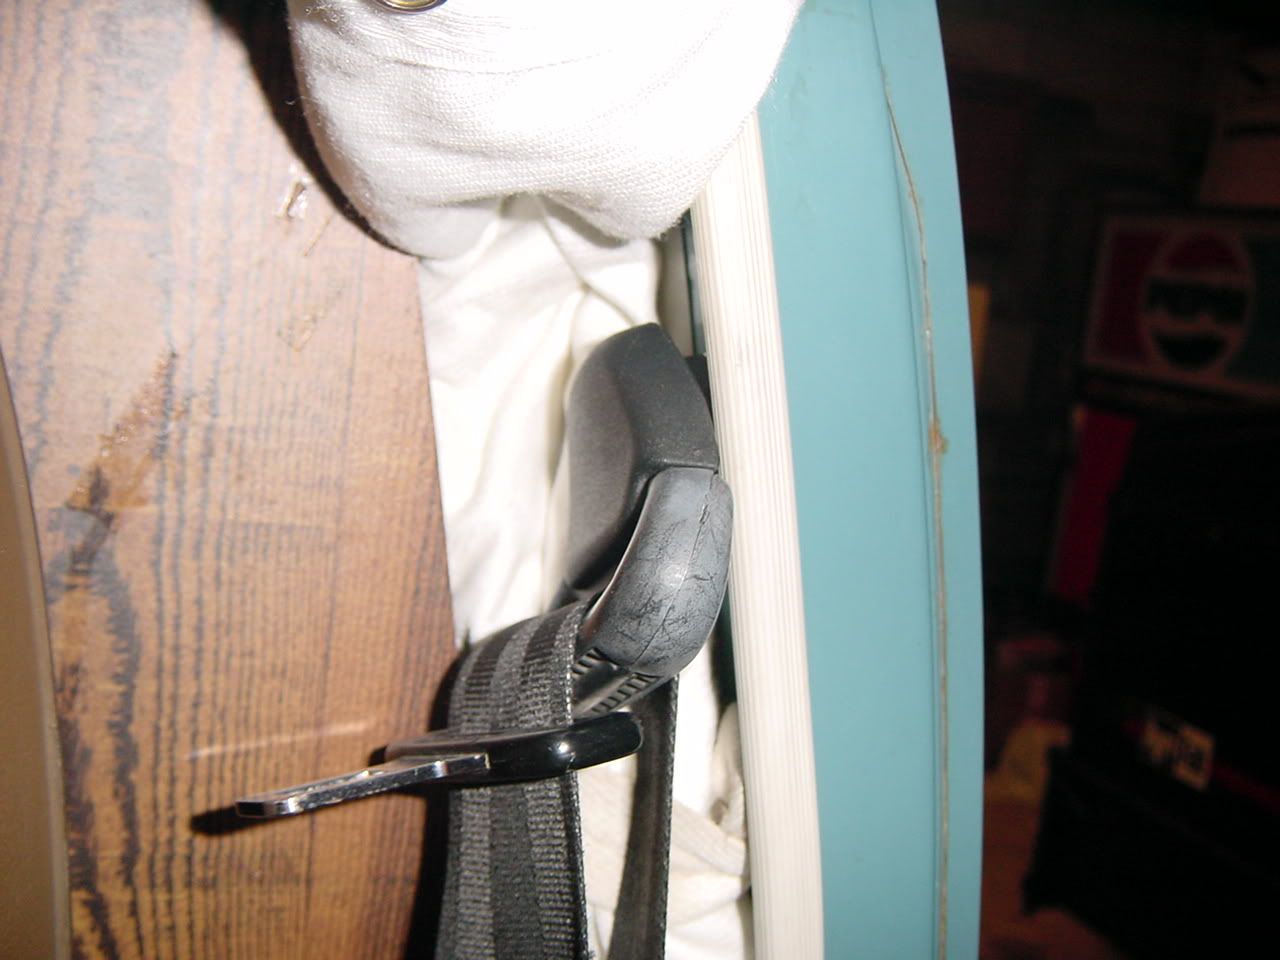
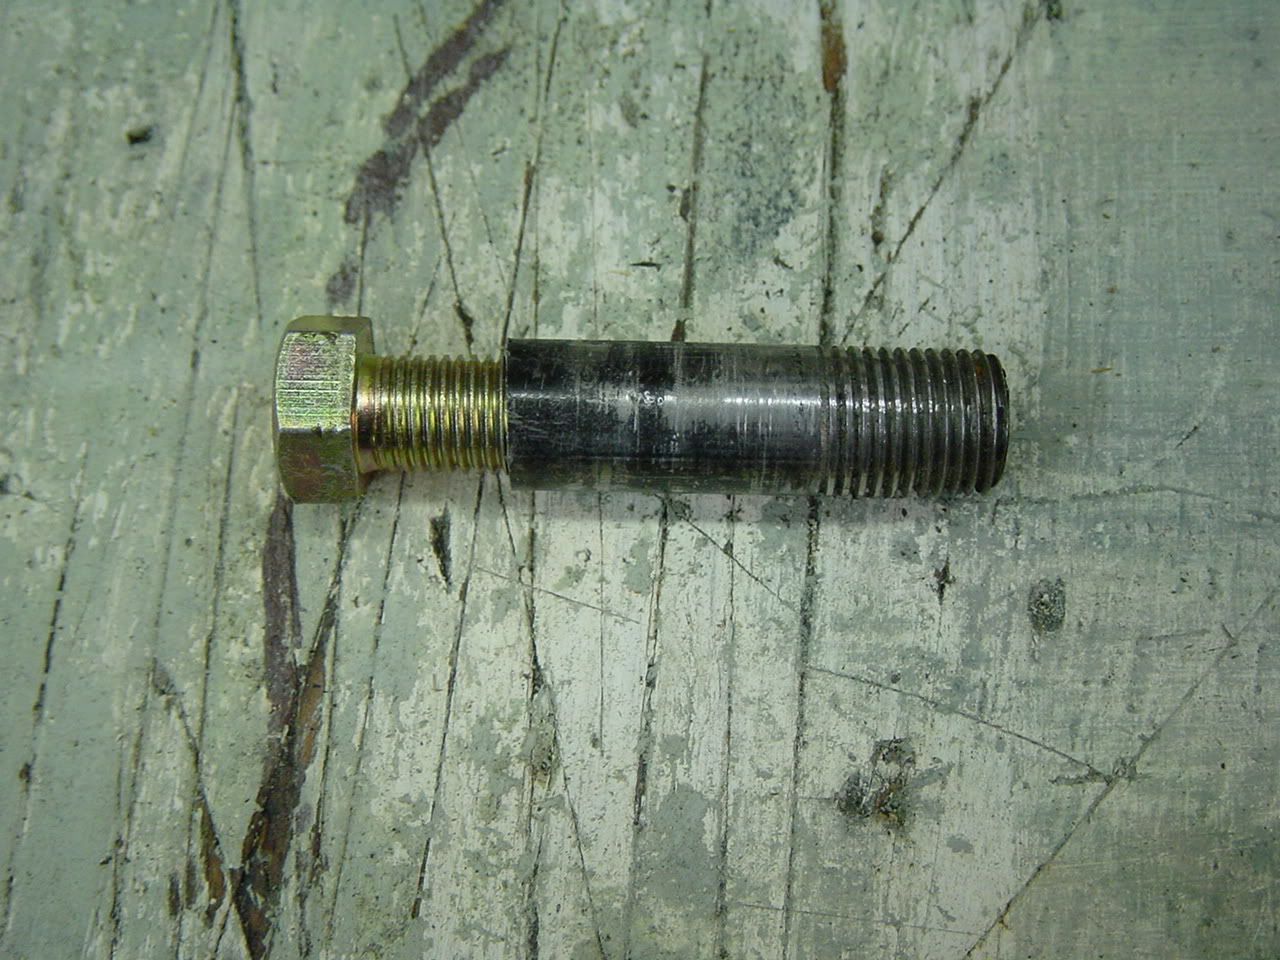
This part is a little tricky as you have to use some type of bushing so the bracket will stick out from the pillar post far enough to not rub or bind on the white vinyl trim. The bolt that mounts this piece to the pillar is called a shoulder bolt which looks like this.
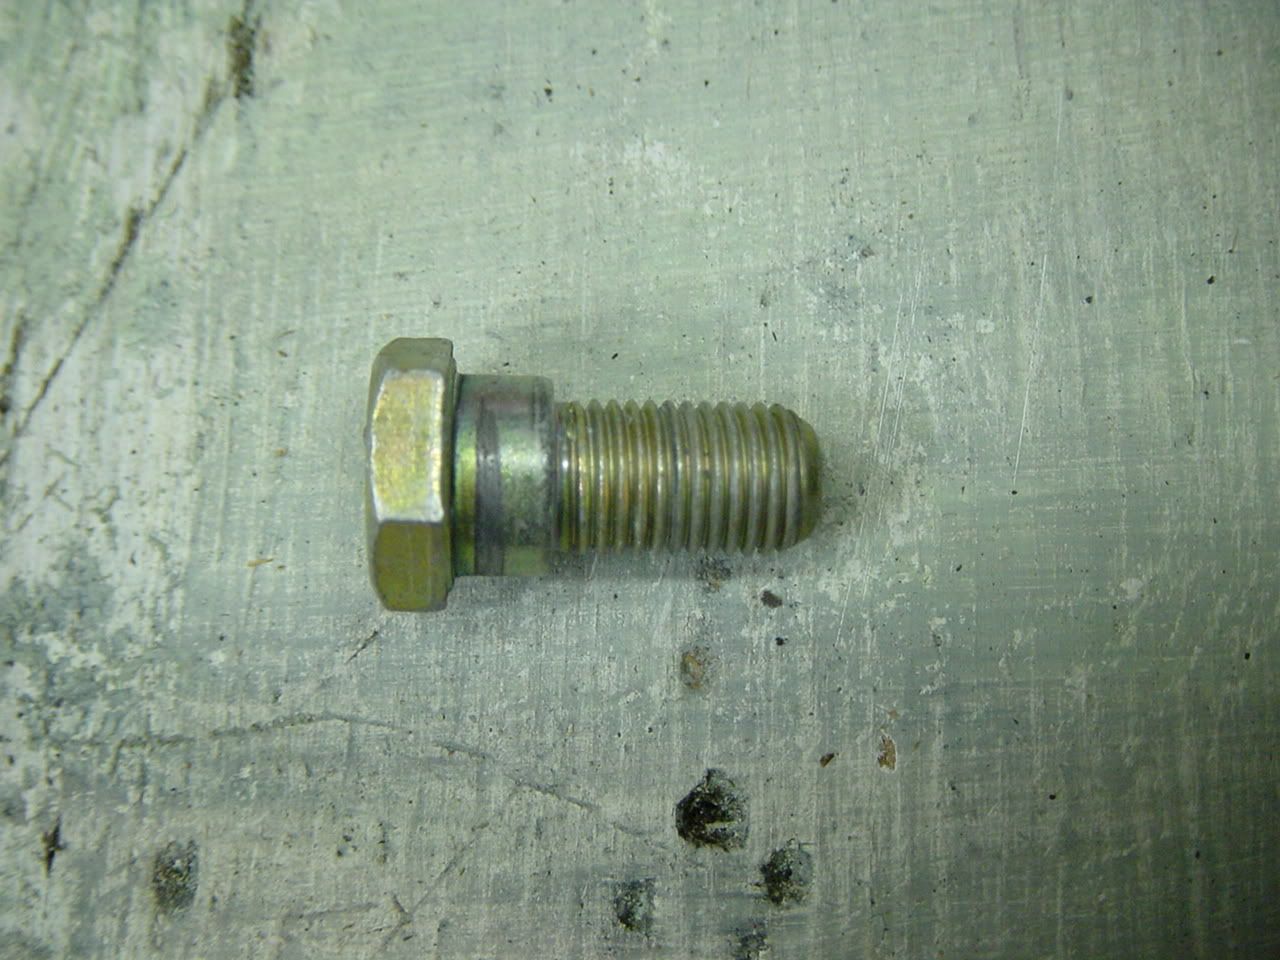
Unfortunately, this bolt (which is the one that came out of the donor Vanagon) isn't long enough and doesn't provide the clearance we need for the white vinyl trim. What I did was use a longer bolt with a short piece of pipe that had the correct inside diameter to slip over the bolt, yet had the correct outside diameter to provide the "shoulder" for the bracket to pivot on. Here are some photos of my longer bolt with some leftover "shoulder stock".
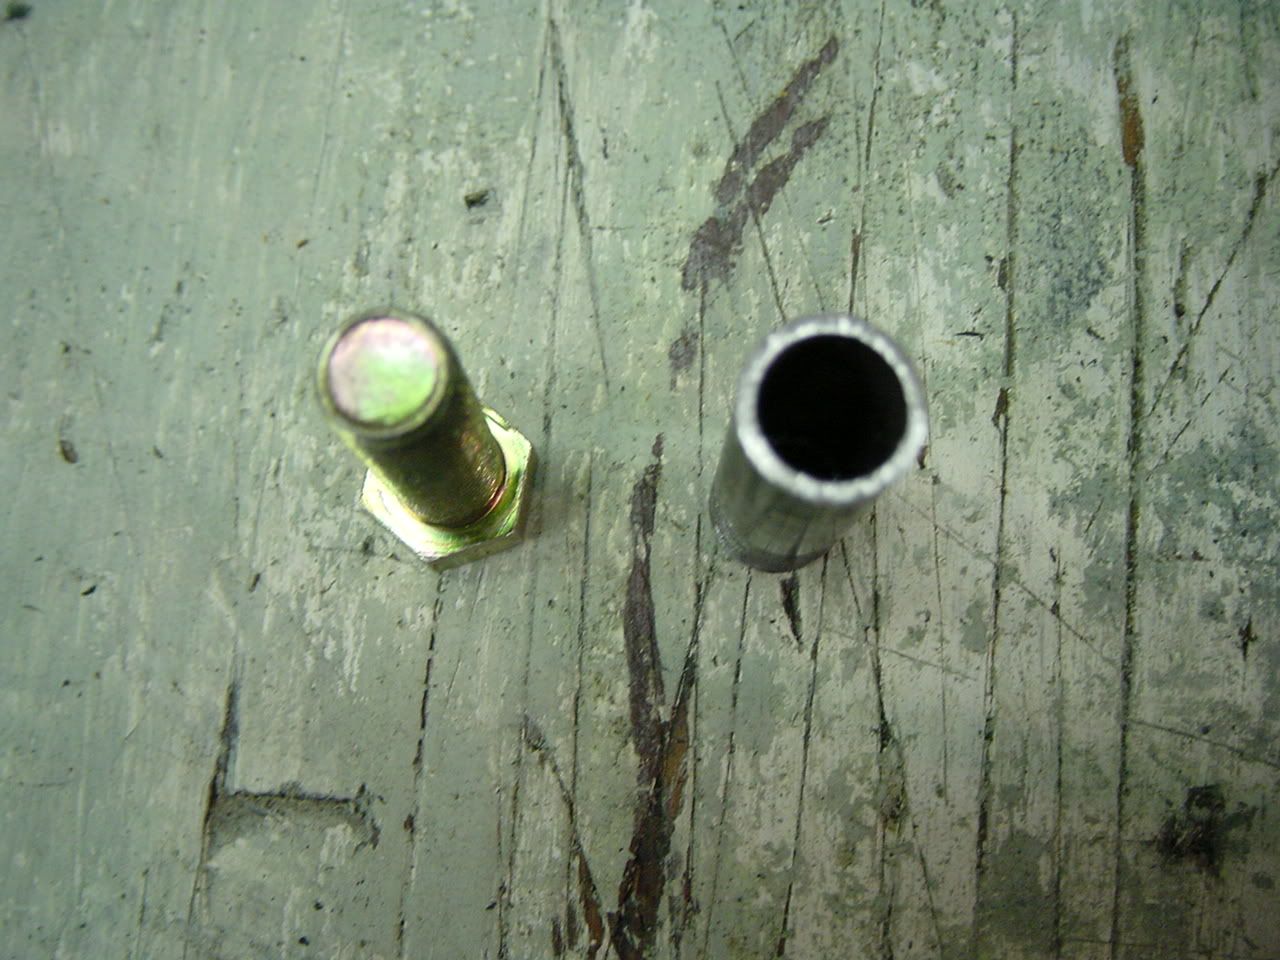
Cut a piece of the pipe the same length as the shoulder on the original bolt and slip it over up to the head. That part is dealt with, now we have to create something for the bolt to tighten against that will allow the clearance for the trim. I used a nut a lock washer and a flat washer to perform this function. In this over-exposed photo, you can sorta see how it went.
Put your bolt with your home made shoulder through the belt bracket and then thread a nut up the bolt and tighten it against your shoulder. Then put a lock and flat washer on the bolt and thread it into the factory-provided threaded hole in the pillar. Tighten the bolt and make sure your belt bracket can still pivot while also not rub the nice white vinyl trim.
Whew! The hard part is over, now for the last step which is mounting the buckle latch to the side of the seat base.
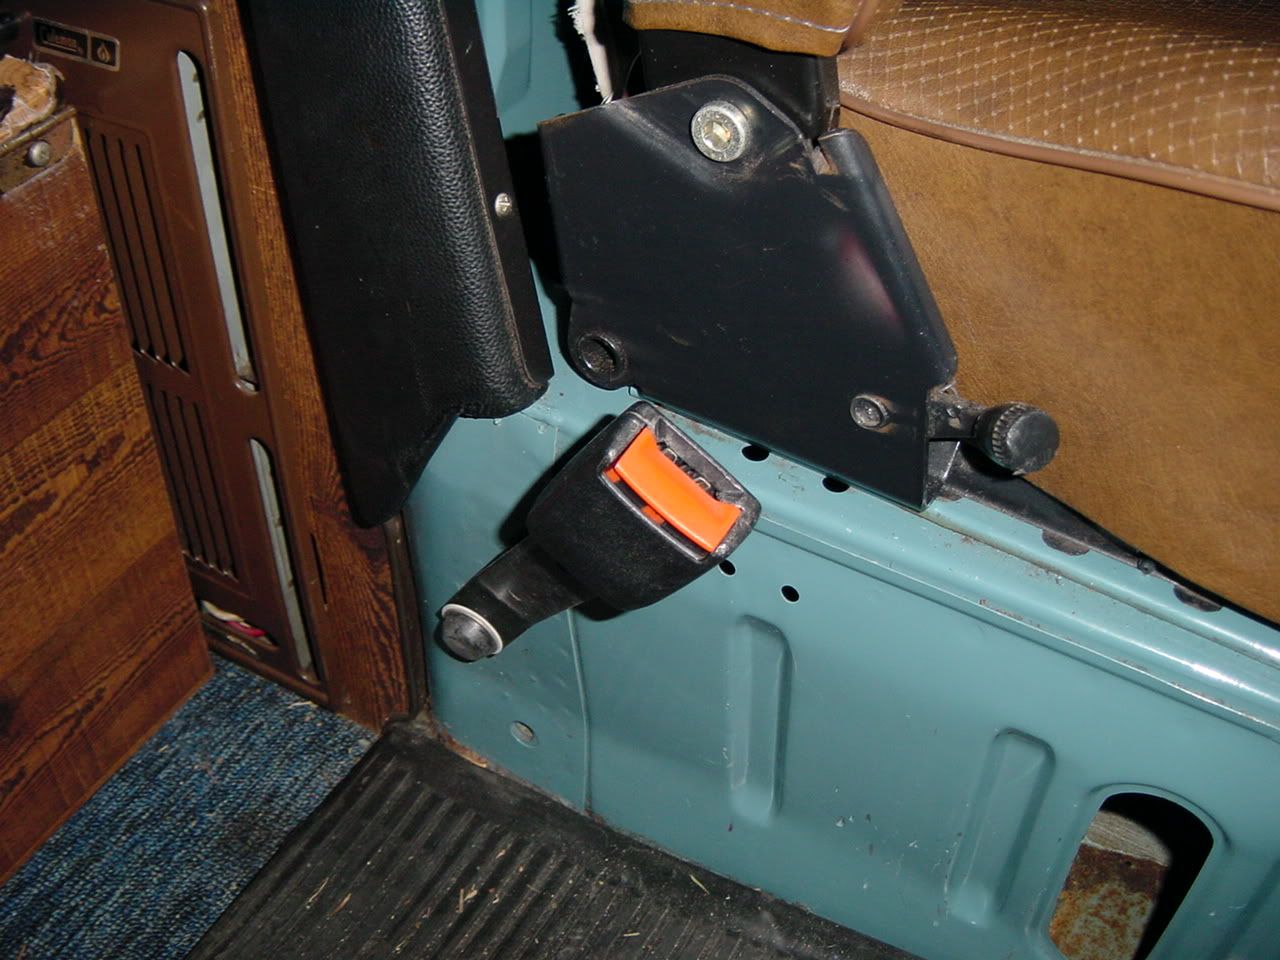
This is pretty straight-forward, just make sure you use the nylon washers that you remembered to take with you from the Vanagon you pillaged. These washers give the buckle mount a little friction so that you can position the buckle to the correct angle and it will stay there without drooping back down to the floor.
I don't have Colin's gift so my explanation might not be as clear as if he had written it, but hopefully you'll get the gist of how this goes. Please, please, please post or PM me if anything doesn't make sense. If the opportunity presents itself, I would recommend that the person installing the belts is the same person who removed them from the donor Vanagon. That way you can draw pictures or just use your photographic memory to recall how all the hardware fits together. It's a fun project and YOU WILL LOVE retractable front belts instead of just lap belts or, even worse, the original NON-retracting belts that were more like a straight-jacket than a seat belt.
Good luck and have fun!
First off, after you've obtained your Vanagon belts, you will almost certainly need some extra hardware (nuts, bolts, brackets, caps, etc.). The hardware is 7/16"-20. No, it's not metric. Seat belt hardware is standardized and apparently the US automakers set the standard. 7/16"-20 grade 8 (hardened) hardware is readily available at your local Ace hardware or other well-stocked hardware store. The brackets, caps and other doo-dads that you may need are available from various online seat belt vendors. I've used www.seatbeltpros.com and had good experiences. Now on with the show...
The lap portion of the belt and the retractor mount to the floor using the same hole that the original lap belt used.
The retractor MUST be vertical for the locking mechanism to work properly. If the retractor is not vertical, the unit will lock preventing you from pulling the belt out which makes it difficult to put the seat belt on. Here is a closer look.
In this photo you can see that I used a right-angle bracket to mount the retractor and a plastic cap to cover the unsightly bolt head. The retractor will have an alignment pin sticking out of one of the small holes just above the black cap. In a Vanagon, this pin aligns the retractor vertically without the assembly-line worker having to put any thought into it. When I installed mine, the pin could be a poking hazard so I removed it by twisting it out with a pair of vice-grips.
The next step is to mount the shoulder bracket which is the part shown here.
This part is a little tricky as you have to use some type of bushing so the bracket will stick out from the pillar post far enough to not rub or bind on the white vinyl trim. The bolt that mounts this piece to the pillar is called a shoulder bolt which looks like this.
Unfortunately, this bolt (which is the one that came out of the donor Vanagon) isn't long enough and doesn't provide the clearance we need for the white vinyl trim. What I did was use a longer bolt with a short piece of pipe that had the correct inside diameter to slip over the bolt, yet had the correct outside diameter to provide the "shoulder" for the bracket to pivot on. Here are some photos of my longer bolt with some leftover "shoulder stock".
Cut a piece of the pipe the same length as the shoulder on the original bolt and slip it over up to the head. That part is dealt with, now we have to create something for the bolt to tighten against that will allow the clearance for the trim. I used a nut a lock washer and a flat washer to perform this function. In this over-exposed photo, you can sorta see how it went.
Put your bolt with your home made shoulder through the belt bracket and then thread a nut up the bolt and tighten it against your shoulder. Then put a lock and flat washer on the bolt and thread it into the factory-provided threaded hole in the pillar. Tighten the bolt and make sure your belt bracket can still pivot while also not rub the nice white vinyl trim.
Whew! The hard part is over, now for the last step which is mounting the buckle latch to the side of the seat base.
This is pretty straight-forward, just make sure you use the nylon washers that you remembered to take with you from the Vanagon you pillaged. These washers give the buckle mount a little friction so that you can position the buckle to the correct angle and it will stay there without drooping back down to the floor.
I don't have Colin's gift so my explanation might not be as clear as if he had written it, but hopefully you'll get the gist of how this goes. Please, please, please post or PM me if anything doesn't make sense. If the opportunity presents itself, I would recommend that the person installing the belts is the same person who removed them from the donor Vanagon. That way you can draw pictures or just use your photographic memory to recall how all the hardware fits together. It's a fun project and YOU WILL LOVE retractable front belts instead of just lap belts or, even worse, the original NON-retracting belts that were more like a straight-jacket than a seat belt.
Good luck and have fun!
- Dick
1970 Transporter. 2015cc, dual Weber IDF 40's
1978 Riviera Camper. Bone stock GE 2.0L F.I.
1979 Super Beetle convertible.
... as it turns out, it was the coil!
1970 Transporter. 2015cc, dual Weber IDF 40's
1978 Riviera Camper. Bone stock GE 2.0L F.I.
1979 Super Beetle convertible.
... as it turns out, it was the coil!
-
jblair630
- Getting Hooked!
- Location: Austin, Texas
- Status: Offline
Hi Dick,
An excellent write up and picture combination. The directions you've provided are straightforward and clear. Give yourself a pat on the back. I don't think that I'll have any problems with putting this together once we have replacement seatbelts in hand.
I do have one question that is more curiosity than need for information. In this picture:
your right angle bracket goes from the original seat belt bolt hole to the retractor. Is the hole in the retractor where you attached the other end of the right angle bracket original to the retractor? From your description I assume that it is. This leads me to wonder where the retractor is mounted on a Vanagon. Is it attached to the B-pillar or does it attach to the Vanagon in some different fashion?
In the long run, it doesn't really matter since I plan on following your most excellent write up. Its just one of those things that will occupy my mind until I find out one way or another. Hey sure beats thinking about work.
Thanks
Jeffrey (Z's husband) Blair
"When you sit with a nice girl for two hours, it seems like two minutes. When you sit on a hot stove for two minutes, it seems like two hours. That's relativity." -- Albert Einstein
Grateful Phred - 1971 Bus
Fweem - 1974 Super Beetle
Grateful Phred - 1971 Bus
Fweem - 1974 Super Beetle
-
dtrumbo
- IAC Addict!
- Location: Mill Creek, WA
- Status: Offline
Under that black cap is a bolt that goes through the right-angle bracket and then through the original "factory" hole in the retractor where I secured it with a lock washer and nut. You are correct, in a Vanagon, the retractor is bolted directly to the B-pillar through that hole (no angle bracket required) and then the entire assembly is covered by a plastic cover. When you go junk-yard hunting, take the covers as well because if they're in good shape, you can sell them on TS to Vanagon owners whose belt covers are cracked or are otherwise not in as good condition.
Let me know how it all goes.
Let me know how it all goes.
- Dick
1970 Transporter. 2015cc, dual Weber IDF 40's
1978 Riviera Camper. Bone stock GE 2.0L F.I.
1979 Super Beetle convertible.
... as it turns out, it was the coil!
1970 Transporter. 2015cc, dual Weber IDF 40's
1978 Riviera Camper. Bone stock GE 2.0L F.I.
1979 Super Beetle convertible.
... as it turns out, it was the coil!