Points Adjustment

Moderators: Sluggo, Amskeptic

User avatar
Manfred
Old School!
Location: Chicago
Status: Offline

Points Adjustment

Post by Manfred » Fri May 29, 2009 8:54 am

O.k. I did a search and couldn't find anything on this topic. Probably because it's so easy no one talks about it.

So I tried to install a Pertronix and was having trouble installing the magnet, so I tried to cut it down. I finally installed the magnet, but the engine would only run for a couple of seconds and it would die. I figured I screwed up the magnet.

So then decided to install a new set of points, since this was a tune-up to start with. I've never installed points before so it took me a while to figure out how the lobes work and all that. I think I finally got it working right, but I'm not getting any spark.

From what I've read there is an adjustment outside of just the small screw that holds the points down. This is supposed to be for fine tuning the adjustment. I'll be damned if I can find it.

I also can't find the bolt that you loosen to adjust the timing.

Please advise.

Peace! :pirate:

User avatar
Bookwus
IAC Addict!
Location: City of Roses
Status: Offline

Post by Bookwus » Fri May 29, 2009 9:04 am

Hiya Man,

Take a look inside the distributor (I'm assuming that you have it out of the Bus right now). Rotate the distributor so you position the points at 6:00 as you look at them. The points should be resting on and attached to the vacuum plate (sort of the floor of the distributor cavity). Look just to the right of the points assembly. It will be very close to the contact points themselves. You should see a notch in the points assembly. And on the vacuum plate you should see a couple of small bumps.

The idea here is that you stick a screwdriver blade so that it is in the points assembly notch. Then by twisting the screwdriver blade against the the bumps you can fine tune the points gap. Your points attachment screw should be in place snugly but not tight. Give it a try after you make sure that the points rubbing block (that little fibre gizmo) is on a high spot on the distributor cam. Then tighten up your screw.
I have cancer.

It does not have me.

User avatar
IFBwax
IAC Addict!
Location: PDX
Status: Offline

Post by IFBwax » Fri May 29, 2009 9:19 am

The bolt to adjust timing is under the distributor on the right side of it.. if you're looking at it from above. It is a sideways very long bolt hard to miss if you know where to look. It seems there are always cables over it obscuring the view.
The best navigators aren't sure where they're going until they get there. And then they're still not sure.

Frank Bama

http://www.partypickle.blogspot.com

User avatar
Manfred
Old School!
Location: Chicago
Status: Offline

Post by Manfred » Fri May 29, 2009 9:26 am

Thanks guys. I've seen pictures of the adjustment bolt and where it supposed to be, but I can't seem to feel it. I guess I'll try again. Yeah, there is no way to look under it, I have to do it all by feel.

I tried to remove the distributor, but I couldn't get it to budge. I assume you need to be able to loosen the adjustment bolt to remove the distributor, which I couldn't find.

User avatar
RSorak 71Westy
IAC Addict!
Location: Memphis, TN
Contact:
Status: Offline

Post by RSorak 71Westy » Fri May 29, 2009 10:05 am

Yes you must remove the adjustment bolt to remove the distributor. You only need to loosen it to set the timing.
Take care,
Rick
Stock 1600 w/dual Solex 34's and header. mildly ported heads and EMPI elephant's feet. SVDA W/pertronix. 73 Thing has been sold. BTW I am a pro wrench have been fixing cars for living for over 30 yrs.

User avatar
LiveonJG
IAC Jester!
Location: Standing on the side of the road, rain falling on my shoes.
Status: Offline

Post by LiveonJG » Fri May 29, 2009 6:43 pm

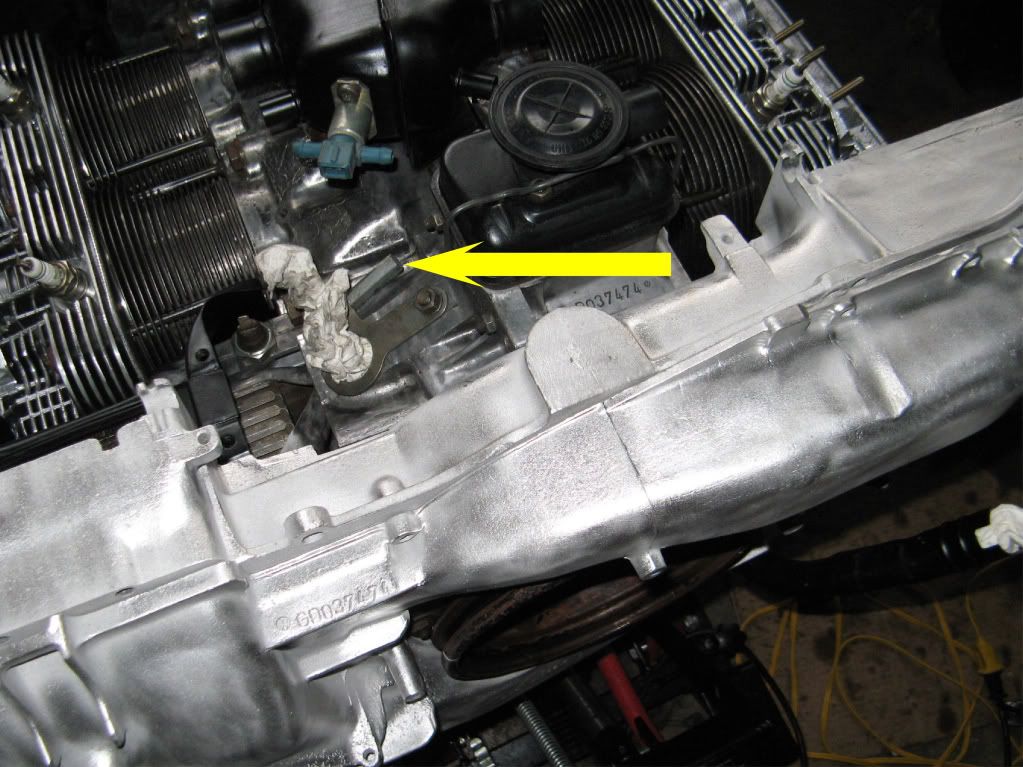
Before you give up on the Pertronix, loosen the adjustment bolt and remove the dizzy.

Here's a pic of the bolt. It requires a 10mm wrench, if you have a GearWrench it's really easy.

Image

Now that it's out, carefully work the magnet on to the shaft, the fit is exact and you'll know when you get it because the magnet will make a little pop noise and seat firmly down.

I like my Pertronix a bunch. I also carry a spare set of points just in case.

-John
Keep it acoustic.

User avatar
Hippie
IAC Addict!
Location: 41º 35' 27" N, 93º 37' 15" W
Status: Offline

Post by Hippie » Fri May 29, 2009 7:17 pm

Don't forget to get the points set before setting the timing, because changing the point gap changes the timing, but not the other way around.

User avatar
Manfred
Old School!
Location: Chicago
Status: Offline

Post by Manfred » Sat May 30, 2009 6:25 am

Not giving up on the Pertronix. I just need to order another magnet. Thanks for the pics.

I don't think this thing will run until I get the points set, but thanks for the heads up.

User avatar
RSorak 71Westy
IAC Addict!
Location: Memphis, TN
Contact:
Status: Offline

Post by RSorak 71Westy » Sat May 30, 2009 7:58 am

Before I understood what points did, I had problems setting/diagnosing them. All the points do is act as switch to interrupt the ground path for the coil. The coil always has hot when the ignition is on. The coil makes a spark when the ground path is interrupted and the magnetic field inside it collapses. This is what makes the spark. So does this help?
Take care,
Rick
Stock 1600 w/dual Solex 34's and header. mildly ported heads and EMPI elephant's feet. SVDA W/pertronix. 73 Thing has been sold. BTW I am a pro wrench have been fixing cars for living for over 30 yrs.

User avatar
Manfred
Old School!
Location: Chicago
Status: Offline

Post by Manfred » Sat May 30, 2009 7:51 pm

Ok so I figured out parts of what is going wrong. The guy who set up the engine put 1 TDC at the opposite side of the mark on the distributor so as soon as I switched around my spark plug wires and set the points it fired up.

Now to the next problem. She will fire up for about 5 to 10 seconds and die. I checked the dwell during the short time it runs. It's reading pretty low. So my guess is that I have a weak spark because of the low dwell. Is my guess correct? So if I increase my gap, I increase my spark. Could there be any thing else going on? It ran like a top before this. No issues at all.


Thanks for all your help.

User avatar
Oregon72
IAC Addict!
Location: Sherwood, Oregon
Status: Offline

Post by Oregon72 » Sat May 30, 2009 8:33 pm

To borrow the words of Hambone's bumper sticker- Less is More

Less gap = more dwell

If you have a low dwell, it means you have too large of a gap for the spark to jump across. I remember hearing that 47 degrees plus or minus 3 is the best. It's better to be on the lower end of those parameters because as your rubbing block wears, your gap lessens and that means your dwell increases. Around 44 or 45 is perfect and your dwell will slowly increase to the mid range as your rubbing block progressively wears down.

I hope that is right - lets wait for verification.
-'72 Westy-

User avatar
Oregon72
IAC Addict!
Location: Sherwood, Oregon
Status: Offline

Post by Oregon72 » Sat May 30, 2009 8:51 pm

Manfred wrote: Could there be any thing else going on? It ran like a top before this. No issues at all.
Like Hippie said - you will need to adjust your timing too now that your point gap has been changed. Did you do that?
-'72 Westy-

User avatar
Manfred
Old School!
Location: Chicago
Status: Offline

Post by Manfred » Sat May 30, 2009 9:57 pm

how do I set my timing when it only runs for 10 seconds?

User avatar
chitwnvw
Resident Troublemaker
Location: Chicago.
Status: Offline

Post by chitwnvw » Sat May 30, 2009 10:10 pm

If you need help let me know.

You can swing by and check out that passenger door too. I did a quick look and there was no rust through I saw. It's save-able I think.

User avatar
Manfred
Old School!
Location: Chicago
Status: Offline

Post by Manfred » Sun May 31, 2009 5:42 am

I may take you up on that, but you might have to make a house call to my garage if you can.

Post Reply