
74 Westy
1800cc Type4 Engine
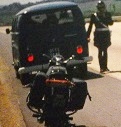
Can I remove the muffler and two HE all together as one unit by removing the two brackets and 8 stud nuts securing the HE?
I'm right at that point, but it is not coming out. I don't think anything else is holding it in place. I removed the bumper. I might need another body to pull down on one side while I do the same on the other side (HE).
Heat Exchanger Removal
-
z

- I'm New!
- Status: Offline
-
Gypsie
- rusty aircooled mekanich
- Location: Treadin' Lightly under the Clear Blue!
- Status: Offline
Re: Heat Exchanger Removal
=D>
And the fact that you didn't mention that it came down on your haid tells me you had yer body mechanics in order. Tricky as one unit.
And the fact that you didn't mention that it came down on your haid tells me you had yer body mechanics in order. Tricky as one unit.
So it all started when I wanted to get better gas mileage....
-
z
- I'm New!
- Status: Offline
Re: Heat Exchanger Removal
I centered my body (head forward) and HAD to use my legs to push up the exhaust/muffler while I pulled down on the HE. The problem was getting out 
-
airkooledchris

- IAC Addict!
- Location: Eureka, California
- Contact:
- Status: Offline
-
z
- I'm New!
- Status: Offline
Re: Heat Exchanger Removal
I will take better pictures of these three items and start a thread on the Type 2 forum to learn if they are in good condition and only needing good scrubbing and high temp coating.
Z
Z
-
Gypsie
- rusty aircooled mekanich
- Location: Treadin' Lightly under the Clear Blue!
- Status: Offline
Re: Heat Exchanger Removal
Oughta be interesting to hear how you get them back in....
May just want to separate them. Getting eight holes to line up with eight bolts will be quite a task. I think the struggle will be more than any 'savings' of not pulling them apart.
Let us know how it goes.
May just want to separate them. Getting eight holes to line up with eight bolts will be quite a task. I think the struggle will be more than any 'savings' of not pulling them apart.
Let us know how it goes.
So it all started when I wanted to get better gas mileage....
-
Amskeptic

- IAC "Help Desk"

- Status: Offline
Re: Heat Exchanger Removal
Now we need to determine how badly things got botched:z wrote:OK, it came out so the answer is yes.
Check the studs in the heads for any mashed threads. They need to be clean and ready for additional work. It is impossible to use a thread chaser die in those confined quarters.
I recommend, as did Gypsie, that you separate the components so you can get the exchangers on without hammering those poor delicate little hard-working studs.
Colin
BobD - 78 Bus . . . 112,730 miles
Chloe - 70 bus . . . 217,593 miles
Naranja - 77 Westy . . . 142,970 miles
Pluck - 1973 Squareback . . . . . . 55,600 miles
Alexus - 91 Lexus LS400 . . . 96,675 miles
Chloe - 70 bus . . . 217,593 miles
Naranja - 77 Westy . . . 142,970 miles
Pluck - 1973 Squareback . . . . . . 55,600 miles
Alexus - 91 Lexus LS400 . . . 96,675 miles
-
z
- I'm New!
- Status: Offline
Re: Heat Exchanger Removal
The reason I got them out all in one unit was because I couldn't get to one of the bolts securing the exhaust (muffler) to each of the HE. Even after removing bumper, I couldn't get to that one bolt, the middle one that sits higher than the other two in the corners. So I went with it. Also, I don't have pneumatic tools and removing those super, mega rusted bolts was dangerous (stripping risk) if not getting a good grip on them.Gypsie wrote:Oughta be interesting to hear how you get them back in....
May just want to separate them. Getting eight holes to line up with eight bolts will be quite a task. I think the struggle will be more than any 'savings' of not pulling them apart.
Let us know how it goes.
I was planning on installing them separately, but then it dawn on me..."how am I going to tighten the middle bolt..."
I'll get closed up pics and get a thread going to see if these units are salvageable....
-
z
- I'm New!
- Status: Offline
Re: Heat Exchanger Removal
Amskeptic wrote:Now we need to determine how badly things got botched:z wrote:OK, it came out so the answer is yes.
Check the studs in the heads for any mashed threads. They need to be clean and ready for additional work. It is impossible to use a thread chaser die in those confined quarters.
I recommend, as did Gypsie, that you separate the components so you can get the exchangers on without hammering those poor delicate little hard-working studs.
Colin
Well, one stud was missing completely. While removing the nuts/washers, two studs came out with nut secured to them. Is this normal? One stud per HE.
As far as stripped thread, I don't think any is stripped, but will check closer on them.
While on my back staring...I also realized that both cylinder head deflector tins are missing. Now I need to figure out how to install these. I don't really want to drop the engine as I believe it is out of my league right now.
As I read threads and even the Bentley, a lot escapes me and is hard to make sense of them. I have much to learn.
Z
-
Amskeptic
- IAC "Help Desk"
- Status: Offline
Re: Heat Exchanger Removal
Typical. I suggest new studs and nuts whenever possible to keep these parts strong as heat kills them.z wrote:
While removing the nuts/washers, two studs came out with nut secured to them. Is this normal? One stud per HE.
I also realized that both cylinder head deflector tins are missing. Now I need to figure out how to install these.
Didn't I answer this question somewhere else? It is easy to remove the rocker assemblies and pushrods (keep oriented!) and pull the pushrod tubes (good time to replace the pushrod tube seals). All very doable and simple if you follow the directions and be clean especially around the pushrod tube holes at the case, clean *before* disassembly and again *while* reassembling.
Colin
BobD - 78 Bus . . . 112,730 miles
Chloe - 70 bus . . . 217,593 miles
Naranja - 77 Westy . . . 142,970 miles
Pluck - 1973 Squareback . . . . . . 55,600 miles
Alexus - 91 Lexus LS400 . . . 96,675 miles
Chloe - 70 bus . . . 217,593 miles
Naranja - 77 Westy . . . 142,970 miles
Pluck - 1973 Squareback . . . . . . 55,600 miles
Alexus - 91 Lexus LS400 . . . 96,675 miles
-
Gypsie
- rusty aircooled mekanich
- Location: Treadin' Lightly under the Clear Blue!
- Status: Offline
Re: Heat Exchanger Removal
Someone with a bus may want to chime in here but with the vanagon the top bolts for the exhaust are hard to reach as well. I have cut a 12 mmm wrench in half (sand the cut edge to round it off and soften it to prevent cutting your hand). This little wrench fits up in the tiny space. I don't actually look at wrenchin' these nuts but feel my way along while laying on the ground ( "use fhe force z...")
2nd the replacement of parts notion. It will also make reassembly easier.
I like the copper lock nuts for the exhaust nuts.
seat your studs in the head 'Gutentight but not ape crazy. (You know the two-nuts-cinched-together-to-make-a-decent-nut/bolt-to-seat-the-stud-trick...?)
This process will bring you closer to your bus. Pulling rocker assemblies and pushrod tubes will help by giving you more room to seat those studs as well as get the tin on.
You can do it, bradda...
So it all started when I wanted to get better gas mileage....
-
chitwnvw

- Resident Troublemaker
- Location: Chicago.
- Status: Offline
Re: Heat Exchanger Removal
Yes, they are hard to get on a bus. On this last project, I took a sawzall with a long metal blade to the nut. The stud was so rusty, I knew I was going to be replacing it. If the nut and threads are in good, non totally rusty shape, you can get your mitt in there and 1/10th of a turn at a time, tighten or loosen the nut.