Bumblebus Restoration Thread - '72 L11H Campmobile.

Bus, Microbus, Transporter, Station Wagon, Vanagon, Camper, Pick-Up.

Moderators: Sluggo, Amskeptic

Post Reply
User avatar
BumbleBus
Addicted!
Location: Whitefish, Montana
Contact:
Status: Offline

Post by BumbleBus » Tue Jun 15, 2010 12:38 pm

The Air-Cooled Ranch wrote:That's all I have to say on the subject. You know my feelings on the alternatives :geek:
Yeah.. sadly I lost out on my recent local opportunity to get those dual Dell 36s. Keeping my eyes peeled for other deals though! Gotta be penny smart for awhile as them pennies is hard to save these days! My engine is stamped CB000000076 so it's about as old and tired as they come for that year, but she pulls hard even untuned as she is now and I was happily surprised that I was reading 100+ on the compression test and that was cold and with unknown valve clearances.. looking forward to re-checking warm and tight.

Anyway.. got my OG horn working last night.. so good in fact it wouldn't shut up no matter what I tried. Haha... looks like I may have to dig into the steering column and try to find the short or whatever. Gotta get'r though since that horn is my final electrical demon.
'72 Sierra Yellow Campmobile

I'd rather have a bottle in front of me than a frontal lobotomy.

User avatar
BumbleBus
Addicted!
Location: Whitefish, Montana
Contact:
Status: Offline

Post by BumbleBus » Sat Jun 19, 2010 7:59 pm

Warm weather and the lure of potential nearby camping weekends is motivating me to get the engine running better so today I did my first ever valve adjustment. I got #3 exhaust/intake rocking and saw the rotor pointing to #1 plug (despite the "mark" @ #3 position) so I knew I was at TDC for #1 based on what I'd read. Took me about 2hrs to get to that point, but then *everything* just made sense. Whoot! Haha.

Image

To my untrained eye things looked pretty grimy, but I soldiered on...

#1/#2:
Image

#3/#4:
Image

All but one of the valves were loose.. not bad in my newbie mind, but loose. Got them all feeling the same with the .15mm and threw new gaskets on and buttoned'r back up. Made some more marks for future reference.

Image

Everything checked out in the distributor and looked pretty clean, gapped right, no excessive wear/tear etc. so I ignored the "mark" being opposite of #1 plug and kept going.

Image

I replaced and relocated my fuel filter and lines for better access and since the filter was pretty fouled I drained the gas and saw a lot of rust sparkles so a tank removal and POR15 is gonna happen at some point soon. Yuck. :pukeleft:

Image

Put a new distributor cap on for the hell of it and a new plug wire from coil and fired her back up. She sounds a LOT better than she used to so I threw a gallon of gas in and drove around for awhile and it's waaaay smoother than before. Dwell still at 47 so next steps are to find/fix any vacuum leaks and get my stupid strobe working so I can make sure the timing is right. It must be close 'cause she drives and sounds like a dream.

Here's a Crappycam™ movie of how she sounds now...

http://picasaweb.google.com/paraparker/ ... 9384337410
'72 Sierra Yellow Campmobile

I'd rather have a bottle in front of me than a frontal lobotomy.

User avatar
BumbleBus
Addicted!
Location: Whitefish, Montana
Contact:
Status: Offline

Post by BumbleBus » Sat Jun 19, 2010 8:06 pm

BumbleBus wrote: #1/#2:
Image

#3/#4:
Image
So... that's interesting... I just noticed the "3" stamp in the first photo and the "1" stamp in the second photo, but the first photo is the *right* side of the engine looking from rear to front and the second photo is the *left* side of the engine from rear to front. Are those cylinder stamps? My understanding from the Muir/Bentley/Online is that it's:

FRONT
3 1
4 2
REAR

So.. WTF? This would explain the distributor mark being 180deg opposite to what I was thinking, but what the hell? Did someone put this motor together backwards or something? If that's the case and I did everything like bizarro world I'm probably okay right? I mean this bay is purring and driving great.

Edumacate me oh wise ones. :flower:
'72 Sierra Yellow Campmobile

I'd rather have a bottle in front of me than a frontal lobotomy.

User avatar
dtrumbo
IAC Addict!
Location: Mill Creek, WA
Status: Offline

Post by dtrumbo » Mon Jun 21, 2010 6:22 am

Those numbers are stamped into the casting when the heads are manufactured and have nothing to do with cylinder order. You're Bentley/Muir understanding of cylinder order is correct. I ignore "the mark" on the distributor and go by which wire on the cap the rotor is pointing to for determining TDC for which cylinder.

Is that gravel pooled around your oil pressure sender?
- Dick

1970 Transporter. 2015cc, dual Weber IDF 40's
1978 Riviera Camper. Bone stock GE 2.0L F.I.
1979 Super Beetle convertible.

... as it turns out, it was the coil!

User avatar
BumbleBus
Addicted!
Location: Whitefish, Montana
Contact:
Status: Offline

Post by BumbleBus » Mon Jun 21, 2010 9:40 am

dtrumbo wrote:Is that gravel pooled around your oil pressure sender?
Thanks for the clarification on the stamps! That stuff is mouse.. uhm.. stuff. I slurp it up with the Shopvac when I discover more and hadn't gotten to that when I snapped the photo.

I went for my longest drive yet and even got'r up to 55mph on a back road, which she very easily got to, but after about 15 miles I was smelling mouse urine and "stuff" in the cabin so I'm going to dive deeper into the exchangers/flaps etc. to make sure nothing more is blocked. I know I need a new thermostat so that needs addressing as well. Drove like a dream and though she seemed hot when I got home the dipstick was cool and the engine bay was cool so maybe that's normal.. only the exhaust (duh) and the valve covers etc. were really hot. The mouse smell had me uber-paranoid.

I've got a lot of learning (cleaning) to do still, but I'm motivated to get'r to Maupin next year.. that looks like a fun weekend! :color:
'72 Sierra Yellow Campmobile

I'd rather have a bottle in front of me than a frontal lobotomy.

User avatar
BumbleBus
Addicted!
Location: Whitefish, Montana
Contact:
Status: Offline

Post by BumbleBus » Sat Jun 26, 2010 6:50 pm

Oye. Attempting to replace totally rusted/seized handbrake cables is a daunting task indeed. After a week of solid effort and lots of liquid wrench I've got just 1 adjusting star unfrozen and one old handbrake cable removed from the drum housing (both cables seem good and seized in there tubes though). Got quite a ways to go.. very frustrating, but reminds one that patience really is a virtue to be cherished.

Lotsa crap to clean up. :pukeleft:
Image

Since the handbrake levers were seized as well the bus was probably driven around with it "engaged" for awhile, which is consistent with the front shoes being a lot more worn than the rear ones. :pukeleft: :pukeleft:
Image

Finally got one out after great effort. :pukeleft: :pukeleft: :pukeleft:
Image

1 star doesn't even have any thread showing. :pukeleft: :pukeleft: :pukeleft: :pukeleft:
Image
'72 Sierra Yellow Campmobile

I'd rather have a bottle in front of me than a frontal lobotomy.

User avatar
BumbleBus
Addicted!
Location: Whitefish, Montana
Contact:
Status: Offline

Re: Bumblebus Restoration Thread - '72 L11H Campmobile.

Post by BumbleBus » Fri May 27, 2011 3:15 pm

Well since it's been almost a *year* since I started my brake job I figgered it was time to finish. Everything turned out well with new pads up front and most rear parts replaced. Even MacGyvered the handbrakes into functioning again. Just need to bleed and do final adjustment and should have nice braking again.

Image

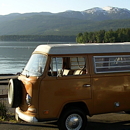
Bumble deserved some new shoes so, thanks to an unexpected work bonus, splurged and blasted/powder coated 5 rims and stuck some 19575R14 'Kooks on there. Sits pretty now.

Image

Continuing in the front still I revived the seats with new HH pads from WW and new vinyl from GoWesty/TMI. What a pisser of a job. Yuck. Threw down some new pedestal rubber and yanked a center mat from one of the 70 parts busses. Front is coming together.

Image

Rear left inner and outer boots were badly split and the axle felt uber-stiff and gritty so I scrounged around on the 70s busses and found a nicer, clean-ish replacement. Swapped it onto the 72. Probably EMPI, but better than crunching around on the old one. Torqued per bentley. Messy job, but packed up nice and greasy.

Image

Popped off the steering wheel for restoration this weekend (if the temps get above 40 for the epoxy that is grrr). POOOOW! Took a lotta force, but came off. Once this wheel is back on and my constantly honking horn is fixed the front is 100% completely done aside from headliner/replacing sun visors.

Image

Now it's on to replacing the gas tank with a mint one from the parts busses. Current one sends more rust than gas to the carbs. *sigh* Firewall sealant is stumping me for now, but brute force should prevail. I did remove the 2 hidden screws underneath so I know that's not the problem. Once the firewall is out gonna slide'r right on over the top hopefully. Once "new" tank is back in and my rotary pump and thermostat replacement are in I'm driving again!! Can't F-ing wait.

Image

Not too terrible so far for a computer desk jocky with zero vehicle experience. Getting there... it's only been 18 months so far. :rr:
'72 Sierra Yellow Campmobile

I'd rather have a bottle in front of me than a frontal lobotomy.

User avatar
Oregon72
IAC Addict!
Location: Sherwood, Oregon
Status: Offline

Re: Bumblebus Restoration Thread - '72 L11H Campmobile.

Post by Oregon72 » Fri May 27, 2011 5:43 pm

BumbleBus wrote: Not too terrible so far for a computer desk jocky with zero vehicle experience. Getting there... it's only been 18 months so far. :rr:
That's for sure!! Those seats look beautiful and the brakes too! One small thing each week and you're going to have a great bus there.

Of course it goes without saying, the Sierra Yellow '72 Campmobile is the best year, color and model VW ever made and even the most novice of bus pilots know that to be true :thumbright:
-'72 Westy-

User avatar
Mike Boell
Old School!
Status: Offline

Re: Bumblebus Restoration Thread - '72 L11H Campmobile.

Post by Mike Boell » Tue May 31, 2011 8:59 am

Looking good.
I have to agree with Oregon 72, a little every day.
When I look at the whole picture of my bus, it's sometimes overwelming.
Mike Boell
1975 FI Westy
Oregon City

SOME PEOPLE ARE LIKE SLINKIES - NOT REALLY GOOD FOR ANYTHING BUT THEY BRING A SMILE TO YOUR FACE WHEN THEY'RE PUSHED DOWN THE STAIRS.

User avatar
Amskeptic
IAC "Help Desk"
IAC "Help Desk"
Status: Offline

Re: Bumblebus Restoration Thread - '72 L11H Campmobile.

Post by Amskeptic » Fri Jun 03, 2011 7:16 am

Oregon72 wrote:
Of course it goes without saying, the Sierra Yellow '72 Campmobile is the best year, color and model VW ever made and even the most novice of bus pilots know that to be true :thumbright:
Should we tell him that the 1972 firewall has an additional screw(s) along the bottom at the center that no one knows about?
Colin
BobD - 78 Bus . . . 112,730 miles
Chloe - 70 bus . . . 217,593 miles
Naranja - 77 Westy . . . 142,970 miles
Pluck - 1973 Squareback . . . . . . 55,600 miles
Alexus - 91 Lexus LS400 . . . 96,675 miles

User avatar
BumbleBus
Addicted!
Location: Whitefish, Montana
Contact:
Status: Offline

Re: Bumblebus Restoration Thread - '72 L11H Campmobile.

Post by BumbleBus » Fri Jun 03, 2011 8:51 am

Amskeptic wrote:Should we tell him that the 1972 firewall has an additional screw(s) along the bottom at the center that no one knows about?
I've since discovered those 2 screws towards the center more. :drunken: There is zero chance of getting to those 2 without major disassembly so I've made the decision to sawzall them this weekend. *sigh* I can't justify dropping a type iv with zero experience just to replace the gas tank.

I did manage to shoe horn a '70 turn signal array into my '72 though earlier this week! It's nice to have left/right/bright toggle without using cheap radio shack switches. Even re-wired it so it should last another 40 years.

Image
'72 Sierra Yellow Campmobile

I'd rather have a bottle in front of me than a frontal lobotomy.

User avatar
BumbleBus
Addicted!
Location: Whitefish, Montana
Contact:
Status: Offline

Re: Bumblebus Restoration Thread - '72 L11H Campmobile.

Post by BumbleBus » Sun Jun 05, 2011 7:29 pm

Figured out that my plastic steering column ring wasn't seated properly at the base thusly causing my horn to blow constantly. Re-seated it and now I have a functioning horn and 100% functioning electrical at this point. Adjusted drum shoes and hand brake and bled brakes with a friend, but I'm still having to pull the hand brake lever pretty much all the way out to get good gripping and I'm running out of adjustment threads on those cables underneath. Hmm. The shoes are only 3-4 "clicks" away from scraping as per instructions. Will keep tweaking.

The front is pretty much done at this point. Looks better in person I swear. :drunken:

Image
'72 Sierra Yellow Campmobile

I'd rather have a bottle in front of me than a frontal lobotomy.

User avatar
dtrumbo
IAC Addict!
Location: Mill Creek, WA
Status: Offline

Re: Bumblebus Restoration Thread - '72 L11H Campmobile.

Post by dtrumbo » Mon Jun 06, 2011 6:24 am

I used the 'Bentley method' to adjust my brakes and experienced similar results. I'll admit, I'm a purist so when it said "three to four clicks away from scraping", by God, that's what I did. Adjusted that way the shoes are so far out they have no chance in hell of contacting the drum with the hand brake lever.

So I went to the Internet, where all good (mis-)information lives and found a better procedure.
  • 1.) Loosen the now "almost out of thread" hand brake adjusters way, way off. More than you think you need to. The hand brake must have no effect on the braking system until the brakes themselves are adjusted properly.

    2.) Jack up the wheel to be adjusted so you can spin it.

    3.) One shoe at a time, tighten the adjuster one click at a time until you can't turn the wheel with your hand anymore.

    4.) Back the adjuster off exactly three clicks.

    5.) Do the other shoe in that drum.

    6.) Go stomp the brake pedal to make sure the shoes are seated nice and pretty.

    7.) Repeat steps 3.) and 4.) to double check your work.

    8.) Do the other wheel(s) that need to be adjusted.

    9.) NOW you can adjust the hand brake per Bentley instructions (handle six clicks out and tighten cables appropriately).

    10.) I needed a step 10.) to round out the list so I guess a test run and a follow-up beer should suffice for step 10.) That said I think I'm a good candidate for a 12.)-step, but that's for another discussion.

I hope this helps. Everyone else chime in if they spot a flaw in my procedure.
- Dick

1970 Transporter. 2015cc, dual Weber IDF 40's
1978 Riviera Camper. Bone stock GE 2.0L F.I.
1979 Super Beetle convertible.

... as it turns out, it was the coil!

User avatar
BumbleBus
Addicted!
Location: Whitefish, Montana
Contact:
Status: Offline

Re: Bumblebus Restoration Thread - '72 L11H Campmobile.

Post by BumbleBus » Mon Jun 06, 2011 8:04 am

Very cool, thanks for taking the time for a step-by-step! I will do this tonight after work and report results.
'72 Sierra Yellow Campmobile

I'd rather have a bottle in front of me than a frontal lobotomy.

User avatar
BumbleBus
Addicted!
Location: Whitefish, Montana
Contact:
Status: Offline

Re: Bumblebus Restoration Thread - '72 L11H Campmobile.

Post by BumbleBus » Mon Jun 06, 2011 7:23 pm

I did as you instructed and that did indeed cinch everything up much tighter, but I'm still using most of the cable thread and am probably at about 12-15 clicks when it bites really good. I'm thinking I need to drive around a bit, seat everything up with some hard braking and re-adjust again. 3-4 star wheel clicks back from a totally bound up wheel still feels like a lotta scraping, but I'm new at this so what do I know.

Definite improvement though!!! Thank you, thank you! :drunken:
'72 Sierra Yellow Campmobile

I'd rather have a bottle in front of me than a frontal lobotomy.

Post Reply