

Hey Adventurewagen!
What I would do is the following.
Drain oil, disconect fuel pump and coil.
Put in new oil and filer.
Install battery.
Do compression check.
If pass
Drain tank
Change fuel lines, change fuel filter
Change plugs
Check points gap.
Try to run.
*grin*
Looks GREAT btw!
Meet "The Green Bus" (Update - 3/31)
-
Adventurewagen
- IAC Addict!
- Location: Seattle
- Status: Offline
No Brakes For YOU!
So with my good friend Jack and his two buddies (3Ton and Stands) we grabbed a good supply of PB Blaster and went after each of the lug nuts. I hit each lug a couple days ago and then one more time yesterday. I figured I’d get to the brakes next since the current brakes don’t actually “stop” the bus. Just to keep the good karma I methodically walked around to each lug with my wife’s mini-hammer and tapped each one about 50 times. After issues with lug nuts on the 68 I had and on my 71 I wasn’t even going to bother touching these without a bit of extra prep work.
I’ve also run across my new most favorite PITA tool for hard to get off bolts. The bus came with a Jack in a bag, a crappy one at that, but in the bag I stumbled across a long breaker bar style ratchet with a 19mm head already on it! Score! It only swivels at the end and doesn’t have gearing like my normal socket, which is good since I broke my last one. Sure enough I broke it on one of my lugs last year trying to remove the overly tightened lugs from Les Schwaab, thanks Les!
Oh, did I mention. I’m on a plane heading to Chicago for a meeting while writing this up, yuck. Not my idea of a party but it does pay the bills and affords me a little cash to buy things like brakes. Needless to say I’m a captive audience and may drag this update out a bit more than necessary to pass the time.
Onto the Brakes!
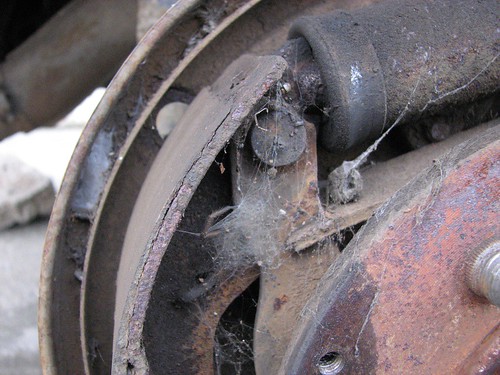
All 20 lugs came undone with no issues! That has to be a record in my books anyway. So Jack got right under there and helped give me some clearance while 3Ton and Stands backed him up. Off with the wheels I say, and here is what we have to look at:
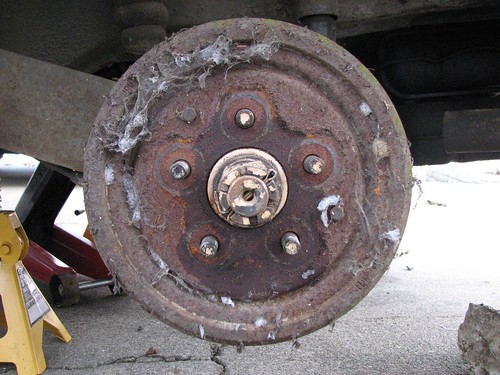
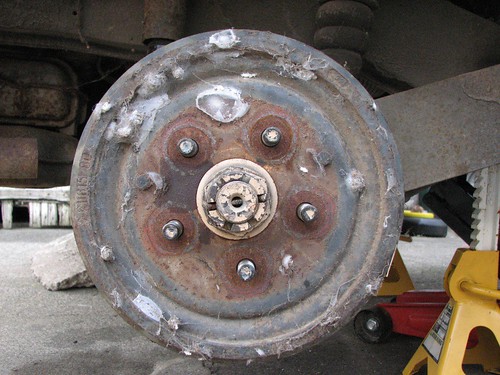
As you can see I’ve purchased my own spider motel but I’m not a fan of them, so out came the trusty shopvac to suck away the ick. The 11mm bolts holding on the drums came off no issue although one of the four has flattened threads but threads fine if I’m careful to keep it to the same hole with its matching flattened threads. The right drum came off no problems but the left must have been exposed to more water and was rusted to the plate. A bit more PB Blaster and a few good whacks to the drum took care of that.
Unfortunately I have no “after” pics today since this was an exploratory mission to see what I had in there and what I’ll need to put on order. Once I get parts in though I’ll list part numbers and prices.
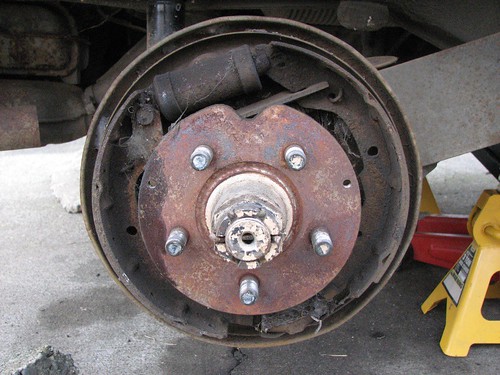
Here is what I found inside the drums. You’ll notice the brake cylinders don’t look to have leaked at all and were replaced at some point. My guess is the mid to late 90’s per all my paperwork and the “Made in USA” was another indication. The cylinder booties have no tears or leaks and the rubber is still very supple. I also tested the bleeder valves to see that they actually opened after snapping them off on my notch with no spares to swap on there So, I think I might keep the cylinders and save a few bucks for now since they both appear in good shape.
If anybody has another recommendation I would be glad to hear it now since I’ve got a line on new shoes and cylinders for 40 bucks total. They aren’t Brazillian but some Italian remakes that look pretty good from what I can see. I’m tempted to just replace them but if nobody objects I’ll just keep them on.
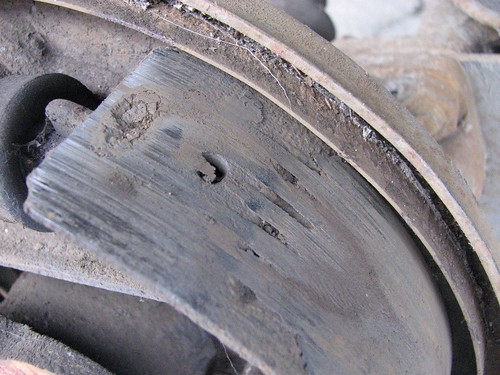
Now I’m not sure about you, but I think my brake shoes may need to be replaced. They look just a “little” thin to me. Then again maybe a once over with the amazing wire brush and they’ll be good, hahaha.
I also noted that where the parking brake attaches it’s just the normal hook on the frame of the shoe. I’d read the 79’s sometimes have the parking brake attached to the shoe with a rivet, so if that was the case it’s been long since replaced. So with new brake shoes on order I cleaned up each of the lugs and smeared a nice coating of anti-seize on them for easy on, easy off and popped the wheels back on then told Jack to go help me up front.
As I mentioned earlier all the lugs came free without issues and I should mention I loosened all 20 before ever lifting the car. I know it seems obvious but one time this guy I know first lifted the bus then proceeded to curse and wonder in amazement on how to get the lugs off without the wheel spinning before realizing the ground might be able to help with that
I actually didn’t get any pics of the calipers since I got a bit gooey with brake fluid and didn’t want to touch the camera anymore but I did get one shot of the rotor which I’ll get into later. I first tapped out the retaining plugs holding the bracket plate for the pads out and then pulled them. The pads looked ok although they had a funny kind of glassy look to them. The real issue was in the caliper; I had hoped to keep the calipers and just replace the pads but the rubber gaskets in the first one were not only shot but crispy.
Closer examination of the calipers revealed the gasket wasn’t just crusty with age but was literally cooked. The brake must have locked up and generated so much heat it burned the O-ring gaskets until they turned into a flaky dusty carbon like state. The pistons are also shot as they not only have surface rust but are beginning to actually pit out. I sealed up the first wheel minus the caliper and moved onto the next.
The left wheel wasn’t fried but it was crusty and splitting, so new calipers it is. My calipers are “Girling” and have a nice big G on the side of them. All the bleeder screws came free so maybe I’ll be able to hang onto them and rebuild them to sell sometime. The hard brake line hits them perpendicular to the caliper and not at an angle like some people have mentioned. I hope to get another set of rebuilt Girling’s or at least some rebuilt ATE calipers from Germany or England.
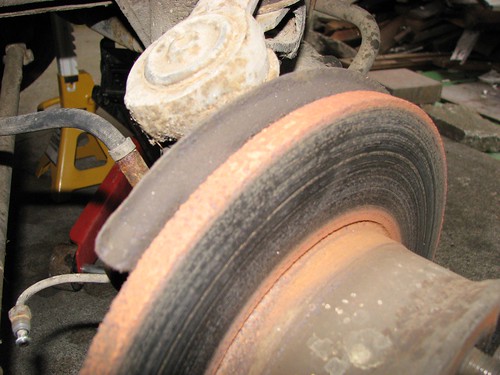
Finally we’ve got Mr. Rotor. He has some pitting on the ends and a bit of rust here and there but doesn’t have a big groove or anything and appears to be fine. You guys will have to tell me if I should get them machined or not because I have no clue. I’m up for getting them worked on though, especially if it would make a big difference, but again I’m trying to keep costs down but not for lack of quality. I think I’m also going to have to order new plastic lines all around. Both of the front lines are cracked and probably all messed up on the inside. It’s not a big job, but will probably add another 50 bucks to the rebuild. Anyway here is the rotor and I look forward to your input:
Check out my post in the “Brakes” section, I started one to discuss the brakes, lines, drums and rotors in greater detail but I’ll copy over anything of great use to this thread. The battery on my laptop is screaming at me, so I think that’s all I’ve got for today and probably for a couple days unless I get parts on order that I can list.
I’m glad a few of you are enjoying the thread, I know I sure do. Me and my TDR bus Marley will be sure to keep you guys up to date along the way. Next up will be a compression test and results and then hopefully episode 2 of “The Brakes”.
So with my good friend Jack and his two buddies (3Ton and Stands) we grabbed a good supply of PB Blaster and went after each of the lug nuts. I hit each lug a couple days ago and then one more time yesterday. I figured I’d get to the brakes next since the current brakes don’t actually “stop” the bus. Just to keep the good karma I methodically walked around to each lug with my wife’s mini-hammer and tapped each one about 50 times. After issues with lug nuts on the 68 I had and on my 71 I wasn’t even going to bother touching these without a bit of extra prep work.
I’ve also run across my new most favorite PITA tool for hard to get off bolts. The bus came with a Jack in a bag, a crappy one at that, but in the bag I stumbled across a long breaker bar style ratchet with a 19mm head already on it! Score! It only swivels at the end and doesn’t have gearing like my normal socket, which is good since I broke my last one. Sure enough I broke it on one of my lugs last year trying to remove the overly tightened lugs from Les Schwaab, thanks Les!
Oh, did I mention. I’m on a plane heading to Chicago for a meeting while writing this up, yuck. Not my idea of a party but it does pay the bills and affords me a little cash to buy things like brakes. Needless to say I’m a captive audience and may drag this update out a bit more than necessary to pass the time.
Onto the Brakes!
All 20 lugs came undone with no issues! That has to be a record in my books anyway. So Jack got right under there and helped give me some clearance while 3Ton and Stands backed him up. Off with the wheels I say, and here is what we have to look at:
As you can see I’ve purchased my own spider motel but I’m not a fan of them, so out came the trusty shopvac to suck away the ick. The 11mm bolts holding on the drums came off no issue although one of the four has flattened threads but threads fine if I’m careful to keep it to the same hole with its matching flattened threads. The right drum came off no problems but the left must have been exposed to more water and was rusted to the plate. A bit more PB Blaster and a few good whacks to the drum took care of that.
Unfortunately I have no “after” pics today since this was an exploratory mission to see what I had in there and what I’ll need to put on order. Once I get parts in though I’ll list part numbers and prices.
Here is what I found inside the drums. You’ll notice the brake cylinders don’t look to have leaked at all and were replaced at some point. My guess is the mid to late 90’s per all my paperwork and the “Made in USA” was another indication. The cylinder booties have no tears or leaks and the rubber is still very supple. I also tested the bleeder valves to see that they actually opened after snapping them off on my notch with no spares to swap on there So, I think I might keep the cylinders and save a few bucks for now since they both appear in good shape.
If anybody has another recommendation I would be glad to hear it now since I’ve got a line on new shoes and cylinders for 40 bucks total. They aren’t Brazillian but some Italian remakes that look pretty good from what I can see. I’m tempted to just replace them but if nobody objects I’ll just keep them on.
Now I’m not sure about you, but I think my brake shoes may need to be replaced. They look just a “little” thin to me. Then again maybe a once over with the amazing wire brush and they’ll be good, hahaha.
I also noted that where the parking brake attaches it’s just the normal hook on the frame of the shoe. I’d read the 79’s sometimes have the parking brake attached to the shoe with a rivet, so if that was the case it’s been long since replaced. So with new brake shoes on order I cleaned up each of the lugs and smeared a nice coating of anti-seize on them for easy on, easy off and popped the wheels back on then told Jack to go help me up front.
As I mentioned earlier all the lugs came free without issues and I should mention I loosened all 20 before ever lifting the car. I know it seems obvious but one time this guy I know first lifted the bus then proceeded to curse and wonder in amazement on how to get the lugs off without the wheel spinning before realizing the ground might be able to help with that
I actually didn’t get any pics of the calipers since I got a bit gooey with brake fluid and didn’t want to touch the camera anymore but I did get one shot of the rotor which I’ll get into later. I first tapped out the retaining plugs holding the bracket plate for the pads out and then pulled them. The pads looked ok although they had a funny kind of glassy look to them. The real issue was in the caliper; I had hoped to keep the calipers and just replace the pads but the rubber gaskets in the first one were not only shot but crispy.
Closer examination of the calipers revealed the gasket wasn’t just crusty with age but was literally cooked. The brake must have locked up and generated so much heat it burned the O-ring gaskets until they turned into a flaky dusty carbon like state. The pistons are also shot as they not only have surface rust but are beginning to actually pit out. I sealed up the first wheel minus the caliper and moved onto the next.
The left wheel wasn’t fried but it was crusty and splitting, so new calipers it is. My calipers are “Girling” and have a nice big G on the side of them. All the bleeder screws came free so maybe I’ll be able to hang onto them and rebuild them to sell sometime. The hard brake line hits them perpendicular to the caliper and not at an angle like some people have mentioned. I hope to get another set of rebuilt Girling’s or at least some rebuilt ATE calipers from Germany or England.
Finally we’ve got Mr. Rotor. He has some pitting on the ends and a bit of rust here and there but doesn’t have a big groove or anything and appears to be fine. You guys will have to tell me if I should get them machined or not because I have no clue. I’m up for getting them worked on though, especially if it would make a big difference, but again I’m trying to keep costs down but not for lack of quality. I think I’m also going to have to order new plastic lines all around. Both of the front lines are cracked and probably all messed up on the inside. It’s not a big job, but will probably add another 50 bucks to the rebuild. Anyway here is the rotor and I look forward to your input:
Check out my post in the “Brakes” section, I started one to discuss the brakes, lines, drums and rotors in greater detail but I’ll copy over anything of great use to this thread. The battery on my laptop is screaming at me, so I think that’s all I’ve got for today and probably for a couple days unless I get parts on order that I can list.
I’m glad a few of you are enjoying the thread, I know I sure do. Me and my TDR bus Marley will be sure to keep you guys up to date along the way. Next up will be a compression test and results and then hopefully episode 2 of “The Brakes”.
63 Gulf Blue Notch
71 Sierra Yellow Adventurewagen

71 Sierra Yellow Adventurewagen
DjEep wrote:Velo? Are you being "over-run"? Do you need to swim through a sea of Mexican anchor-babies to get to your bus in the morning?
-
Adventurewagen
- IAC Addict!
- Location: Seattle
- Status: Offline
Out I tell you!
So if you haven't been following it I learned that the spark plug on #3 had been stripped but re-tapped larger. I don't know if it had an insert or not but one wasn't in there. After some debate I realized I was going to need to pull the engine.
Here is the thread I'll keep updating about the stripped plug on #3:
Stripped Spark Plug Hole Thread
So I pulled the engine. I've pulled the T1 engines and my notch's T3 but I've never dropped a TIV. I'd have to say its just as easy as my T1 just more crap to disconnect.
To help pull the engine I followed Ratwell's awesome list and pictures for pulling the engine. It took me and a buddy about 2hrs total to pull it and I'm glad I did.
Engine Removal for 72-79 by Ratwell
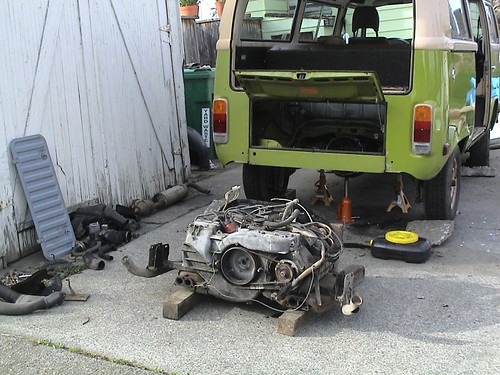
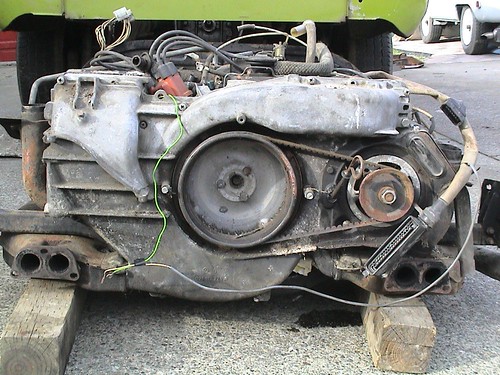
So enough of my babbling here are some pics of the progress. Here is the whole enchilada. The bus, the extra stuff and the big old block of an engine which didn't seem much heavier than the other engines I've dropped.
Here are a couple close ups of the block.

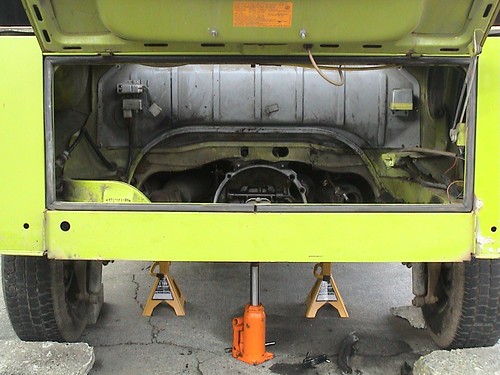
Here is the engine compartment. I think this pic turned out kinda artsy, at least thats as artsy as i get with the green, yellow and orange colors standing out.
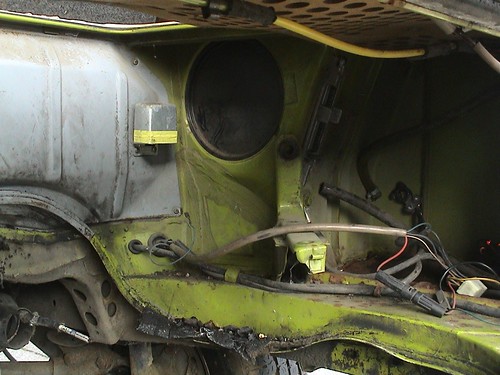
A couple more of the interior. I'll get some clean up shots in another day.
Here is some of the dirty crap all over the block. I was fooling myself to think i could really clean it all anyway without pulling the engine. Now I just need to keep myself from spending too much time on it.
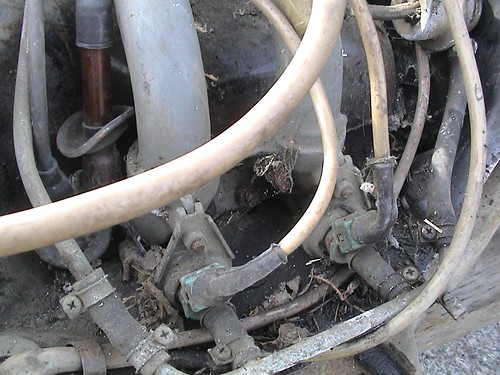
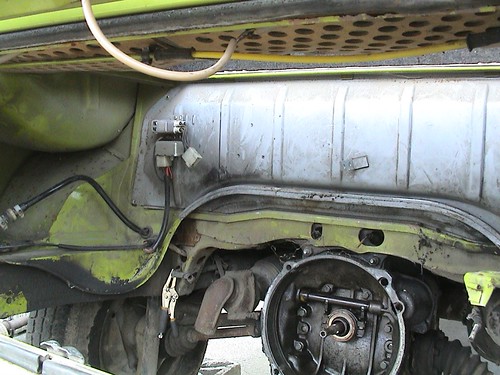
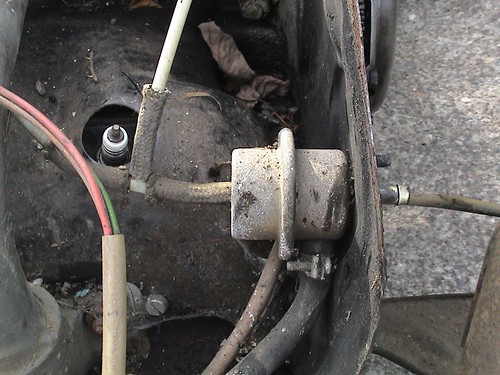
So here is a question, what filter is this one? I must have missed it in the bentley. It's right before 1 and 2 and from the looks of it it's trashed and I'll need a new one.
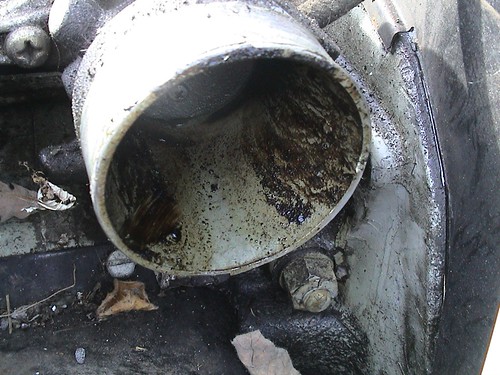
Here is the final pic. It's the outlet on the plenum that goes to the s-boot and into the AFM. It's got a lot of sludge, how bad does that look? Regular build up or is it telling me something else.
So if you haven't been following it I learned that the spark plug on #3 had been stripped but re-tapped larger. I don't know if it had an insert or not but one wasn't in there. After some debate I realized I was going to need to pull the engine.
Here is the thread I'll keep updating about the stripped plug on #3:
Stripped Spark Plug Hole Thread
So I pulled the engine. I've pulled the T1 engines and my notch's T3 but I've never dropped a TIV. I'd have to say its just as easy as my T1 just more crap to disconnect.
To help pull the engine I followed Ratwell's awesome list and pictures for pulling the engine. It took me and a buddy about 2hrs total to pull it and I'm glad I did.
Engine Removal for 72-79 by Ratwell
So enough of my babbling here are some pics of the progress. Here is the whole enchilada. The bus, the extra stuff and the big old block of an engine which didn't seem much heavier than the other engines I've dropped.
Here are a couple close ups of the block.
Here is the engine compartment. I think this pic turned out kinda artsy, at least thats as artsy as i get with the green, yellow and orange colors standing out.
A couple more of the interior. I'll get some clean up shots in another day.
Here is some of the dirty crap all over the block. I was fooling myself to think i could really clean it all anyway without pulling the engine. Now I just need to keep myself from spending too much time on it.
So here is a question, what filter is this one? I must have missed it in the bentley. It's right before 1 and 2 and from the looks of it it's trashed and I'll need a new one.
Here is the final pic. It's the outlet on the plenum that goes to the s-boot and into the AFM. It's got a lot of sludge, how bad does that look? Regular build up or is it telling me something else.
63 Gulf Blue Notch
71 Sierra Yellow Adventurewagen
71 Sierra Yellow Adventurewagen
DjEep wrote:Velo? Are you being "over-run"? Do you need to swim through a sea of Mexican anchor-babies to get to your bus in the morning?


-
Adventurewagen
- IAC Addict!
- Location: Seattle
- Status: Offline
Yah, its in the plans. I just need to find a bucket to drain the tank into. Depending on what comes out will depend on whether I clean it or not.
If what drains out looks good then I probably won't pull the tank and clean it. I could obviously do everything to the umpteenth degree but I'm going to have to draw the line somewhere and just do only whats necessary to get it running and in good condition.
If I end up keeping the bus which I think I might then I'll end up pulling the engine again anyway and detailing absolutely everything. I am going to paint the tin and the new calipers when they come in but that's about it, no fan shroud or anything.
63 Gulf Blue Notch
71 Sierra Yellow Adventurewagen
71 Sierra Yellow Adventurewagen
DjEep wrote:Velo? Are you being "over-run"? Do you need to swim through a sea of Mexican anchor-babies to get to your bus in the morning?
-
Westy78
- IAC Addict!
- Location: Stumptown OR
- Status: Offline
It's not a filter but the fuel pressure regulator. It's a fuel injection thang. Bus is looking good!Adventurewagen wrote:So here is a question, what filter is this one? I must have missed it in the bentley. It's right before 1 and 2 and from the looks of it it's trashed and I'll need a new one.
Chorizo, it's what's for breakfast.
-
Adventurewagen
- IAC Addict!
- Location: Seattle
- Status: Offline
Thanks! I guess I could have looked it up in the Bentley but was lazy.Westy78 wrote:It's not a filter but the fuel pressure regulator. It's a fuel injection thang. Bus is looking good!Adventurewagen wrote:So here is a question, what filter is this one? I must have missed it in the bentley. It's right before 1 and 2 and from the looks of it it's trashed and I'll need a new one.
I think I need a new one unless there is a way to clean it out. One entire end is plugged up solid with goo.
They look like expensive little buggers though:
Busdepot has:
Bosch 022-906-035 for $89.61
and
Bus-Boys has the same exact Bosch one for $107.00!
63 Gulf Blue Notch
71 Sierra Yellow Adventurewagen
71 Sierra Yellow Adventurewagen
DjEep wrote:Velo? Are you being "over-run"? Do you need to swim through a sea of Mexican anchor-babies to get to your bus in the morning?
-
Vdubtech

- IAC Addict!
- Location: East Syracuse, NY
- Status: Offline
Just an FYI--you have no need for that bottle jack under the tranny. It is well supported both front and back by tranny mounts and it isn't going anywhere. '72-'79 Bus trannies have rear mounts that hold it in there quite nicely.
My '79 Westy Rebuild Thread:
http://itinerant-air-cooled.com/viewtopic.php?t=6073
http://itinerant-air-cooled.com/viewtopic.php?t=6073
-
Sylvester

- Bad Old Puddy Tat.
- Location: Sylvester, Georgia
- Contact:
- Status: Offline
Hey Spiffy, what happened with your Bus deal? Details?spiffy wrote:Good deal!!
You are really diving into your new bus, we had to bail on our purchase so we will have to live through you! =D>
Up, up the long, delirious, burning blue, I’ve topped the wind-swept heights with easy grace. Where never lark, or even eagle flew. And, while with silent, lifting mind I've trod, The high untrespassed sanctity of space, Put out my hand, and touched the face of God.

-
Adventurewagen
- IAC Addict!
- Location: Seattle
- Status: Offline
Hahaha, force of habit I guess with the Type 1's.Vdubtech wrote:Just an FYI--you have no need for that bottle jack under the tranny. It is well supported both front and back by tranny mounts and it isn't going anywhere. '72-'79 Bus trannies have rear mounts that hold it in there quite nicely.
63 Gulf Blue Notch
71 Sierra Yellow Adventurewagen
71 Sierra Yellow Adventurewagen
DjEep wrote:Velo? Are you being "over-run"? Do you need to swim through a sea of Mexican anchor-babies to get to your bus in the morning?
-
spiffy

- IAC Addict!
- Location: Walla Walla, WA
- Status: Offline
My wife and I talked it over and we concluded that we needed another bus like we needed another hole in our heads so we chose to hang onto our greenbacks for projects on our current bus....(I will just live through you folks on the forum)Sylvester wrote:Hey Spiffy, what happened with your Bus deal? Details?spiffy wrote:Good deal!!
You are really diving into your new bus, we had to bail on our purchase so we will have to live through you! =D>
Adventurewagen, my wife and I volunteered to work the gate at the NW VW meet this summer so hopefully we can meet you for the first time there and it would be great to see that new bus!!!!
78 Riviera "Spiffy"
67 Riviera "Bill"
67 Riviera "Bill"
-
snotty

- I'm New!
- Status: Offline
Ha! On at last...
Though I'd use my first IAC post to say what a great thread this is...love this kind of stuff. Can't believe what what good condition the bus is in, bashed in front aside: you're a lucky fellow, AW.
Not too keen on the mould and other dead stuff, tho'.
Keep the reports coming!
Richard
Though I'd use my first IAC post to say what a great thread this is...love this kind of stuff. Can't believe what what good condition the bus is in, bashed in front aside: you're a lucky fellow, AW.
Not too keen on the mould and other dead stuff, tho'.
Keep the reports coming!
Richard
1978 1600 Sage Green/White Bay